This guide will walk you through the process of buying Monero (XMR) from
LocalMonero. There is already
a guide on the
LocalMonero website. However, this how-to provides in-depth step-by-step instructions on how to make a
purchase.
LocalMonero is great because you can anonymously purchase Monero. LocalMonero transactions are usually done
in person, making a cash deposit at an ATM, or employing one of the many other payment methods available.
You may be wondering, how can we be sure that the seller doesn’t just scam the buyer? Well, LocalMonero
acts as an escrow service. This means that the Monero you are buying from the seller is actually held by
LocalMonero, and will only be disbursed after all the conditions between the buyer and the seller are
settled. If anything goes wrong, you can open a dispute, and LocalMonero will step in to sort out the issue.
Also the guys that run the LocalMonero service are active within the Monero subreddit and appear to be genuine
guys going above and beyond to help others.
The only real downside to LocalMonero is it is usually a little more expensive than buying Monero from an
exchange, but, you are buying it with enhanced anonymity. If you want to buy Monero as cheaply as possible
see one of our other guides on
here.
Step 1.
Go to
LocalMonero. You will end up on
the LocalMonero homepage.
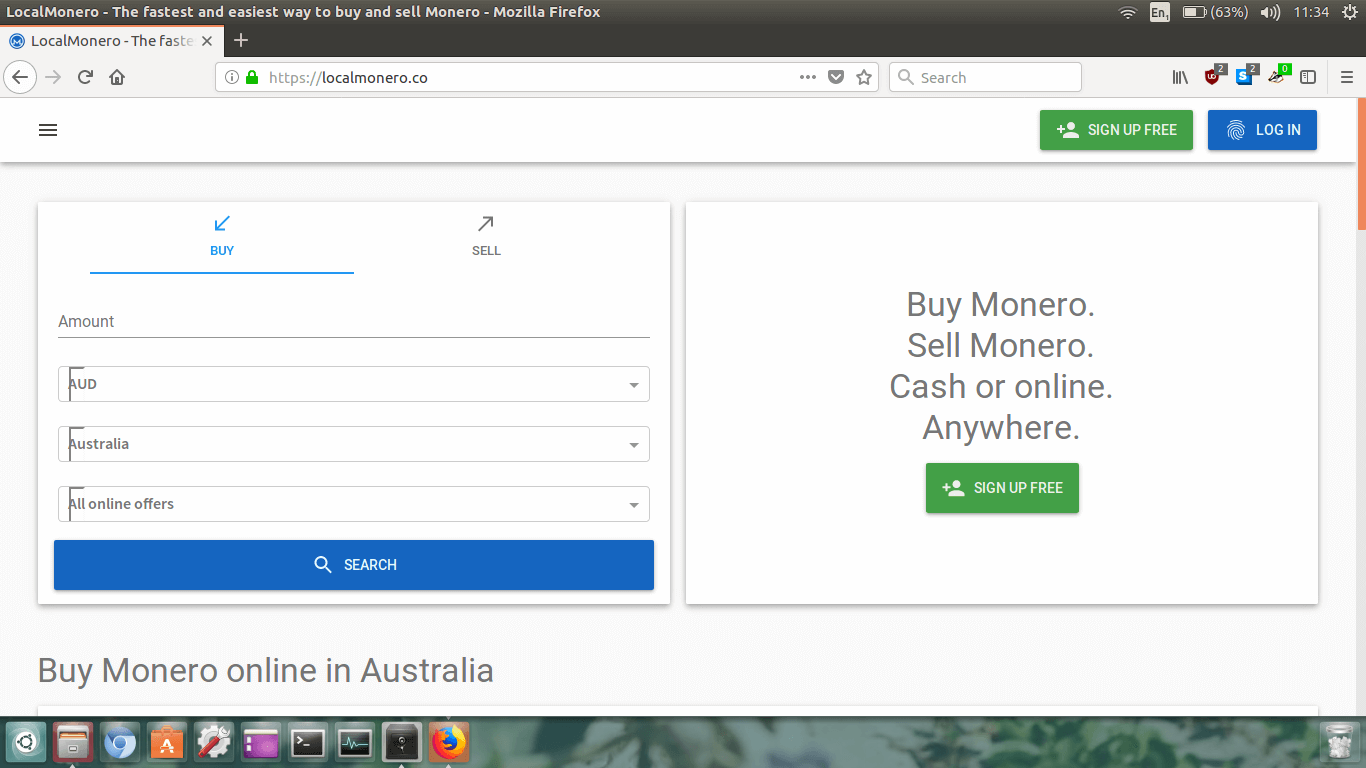
Avoid any potential phishing attacks in which you end up on a fake website by making sure the website address
is correct (https://localmonero.co).
The first thing we need to do is sign up so click on the big green button
SIGN UP FREE.
Step 2.
Now we need to enter in our user information.
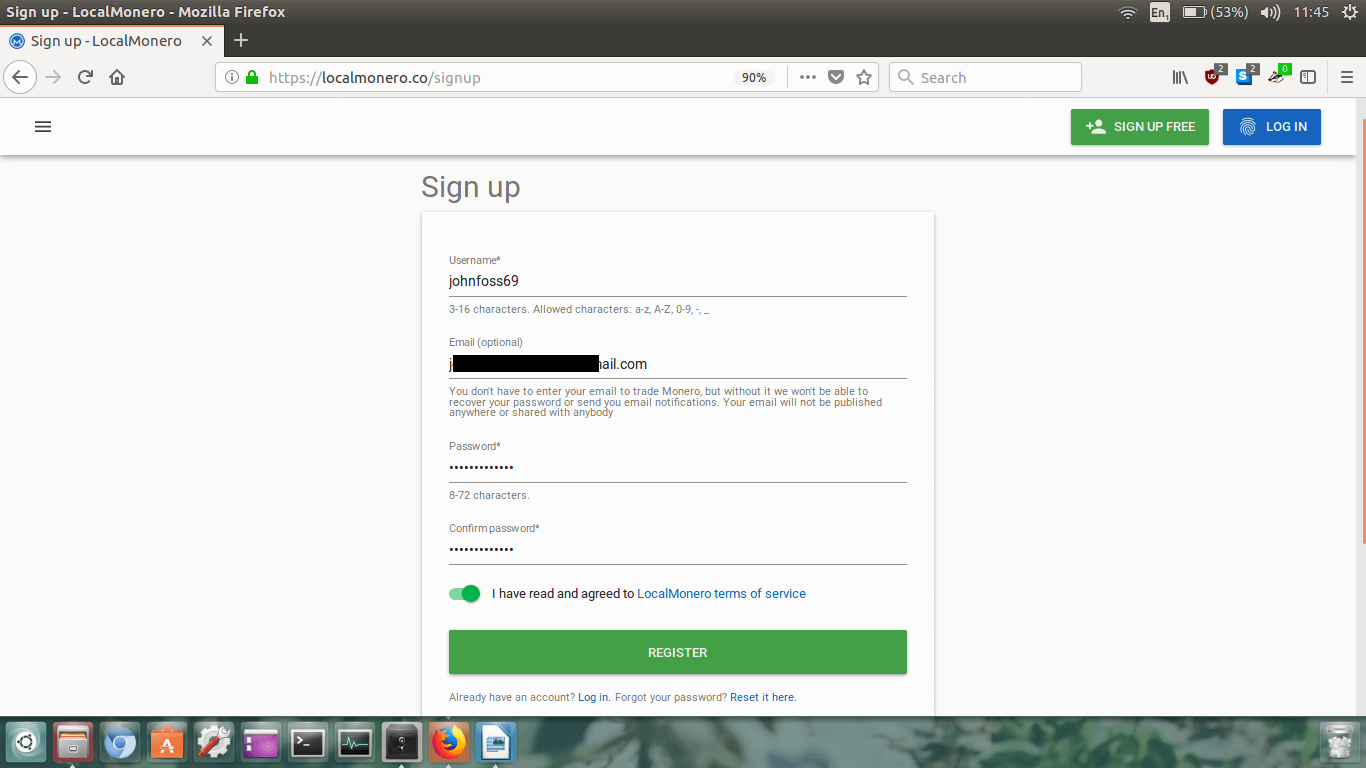
First enter in your username.
Type in your email address if you are happy to do so. This is optional, so if you require a high level
of privacy you can leave your email address out, but if you forget your password then you can’t recover it.
If you can’t risk forgetting your password you can just use a throwaway email address.
Next type in your password twice, then click the terms of service toggle.
Double check everything is correct and then click the big green
REGISTER button and wait for the page to load.
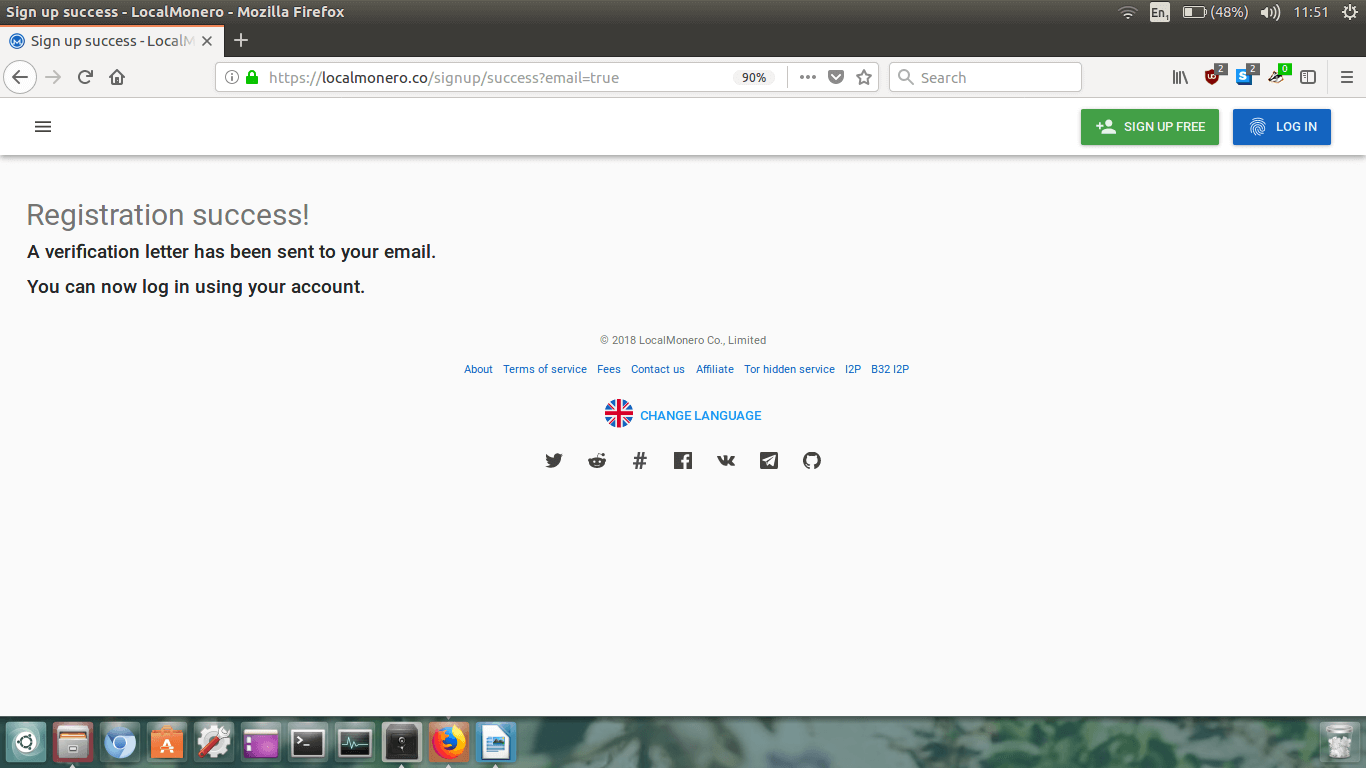
If everything was successful you will see the
Registration success! page.
Good, it’s now time to log in.
Step 3.
Click the blue
LOG IN button in the upper right hand corner of
the page.
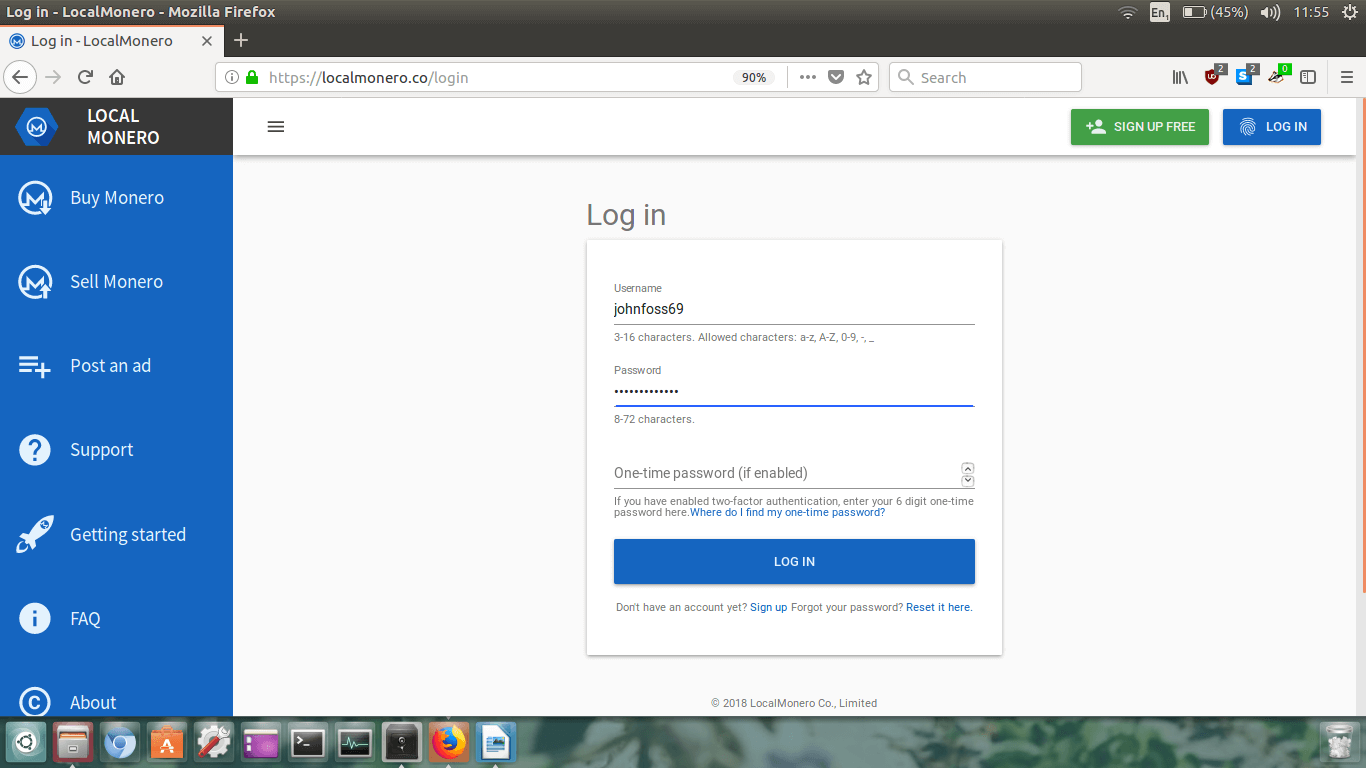
Type in your username and password. Ignore the one-time password as we haven’t enabled it.
Click
LOG IN.
Step 4.
Ok now you will be logged in and the LocalMonero homepage will be a little bit different looking.
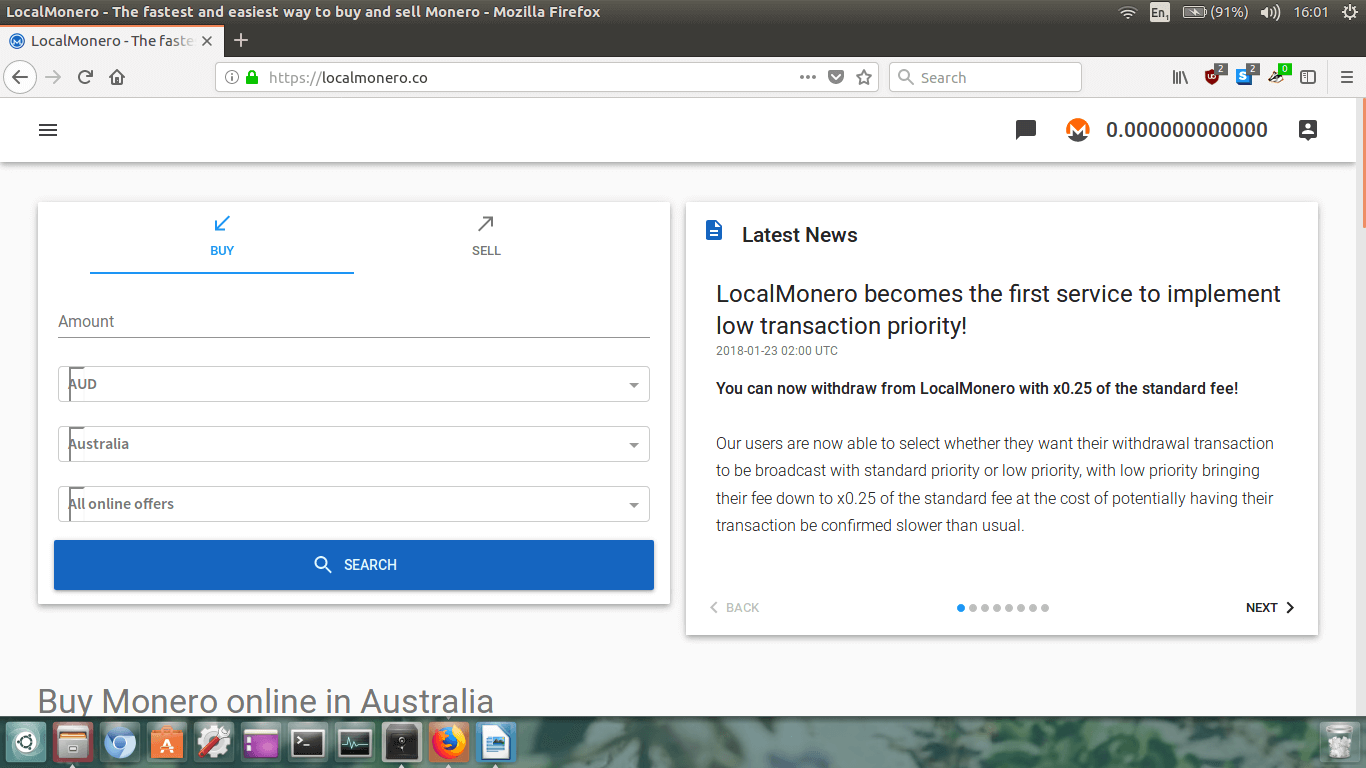
Now, we’re ready to buy some Monero. In my opinion, the two best ways to go about is to either buy your
Monero with your local fiat currency (e.g. USD, EUR, GBP, AUD, etc.) or Bitcoin.
For this guide, we will assume that you do not own any Bitcoin, and want to somewhat anonymously buy
Monero using your local fiat currency.
The first thing to do is select your local currency. I am Australian so I will choose AUD.
Next I will choose my country so I have selected Australia.
And finally, I will leave the payment type as
All online offers.
I can choose a specific payment type such as bank transfer, cash, or paypal, but at this point i’m not
sure what’s available in my local area, so I will do a broad search in order to keep open all my
possible methods of purchasing Monero.
If it all looks good, now we will click the big blue
SEARCH button.
Step 5.
The search results will now appear on the newly loaded page.
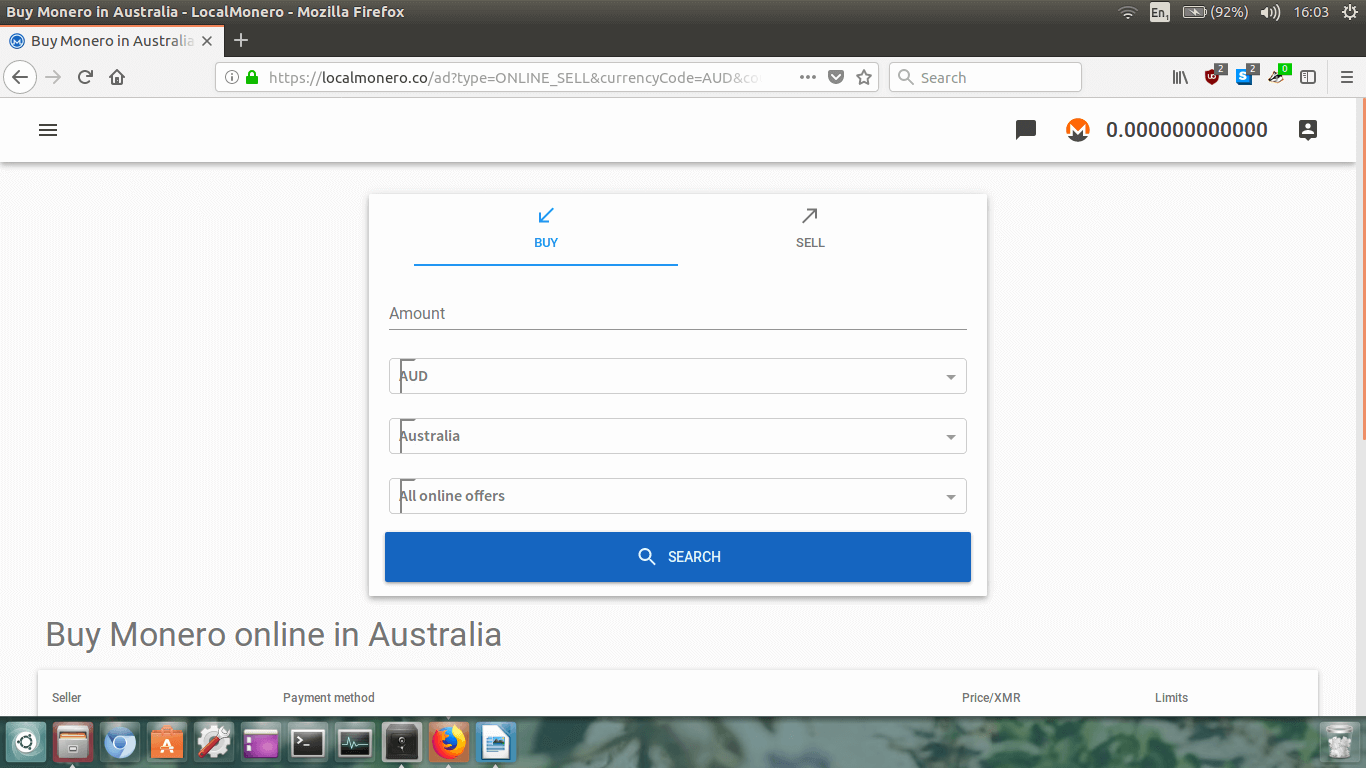
At the moment we need to scroll down to view the Monero for sale listings.
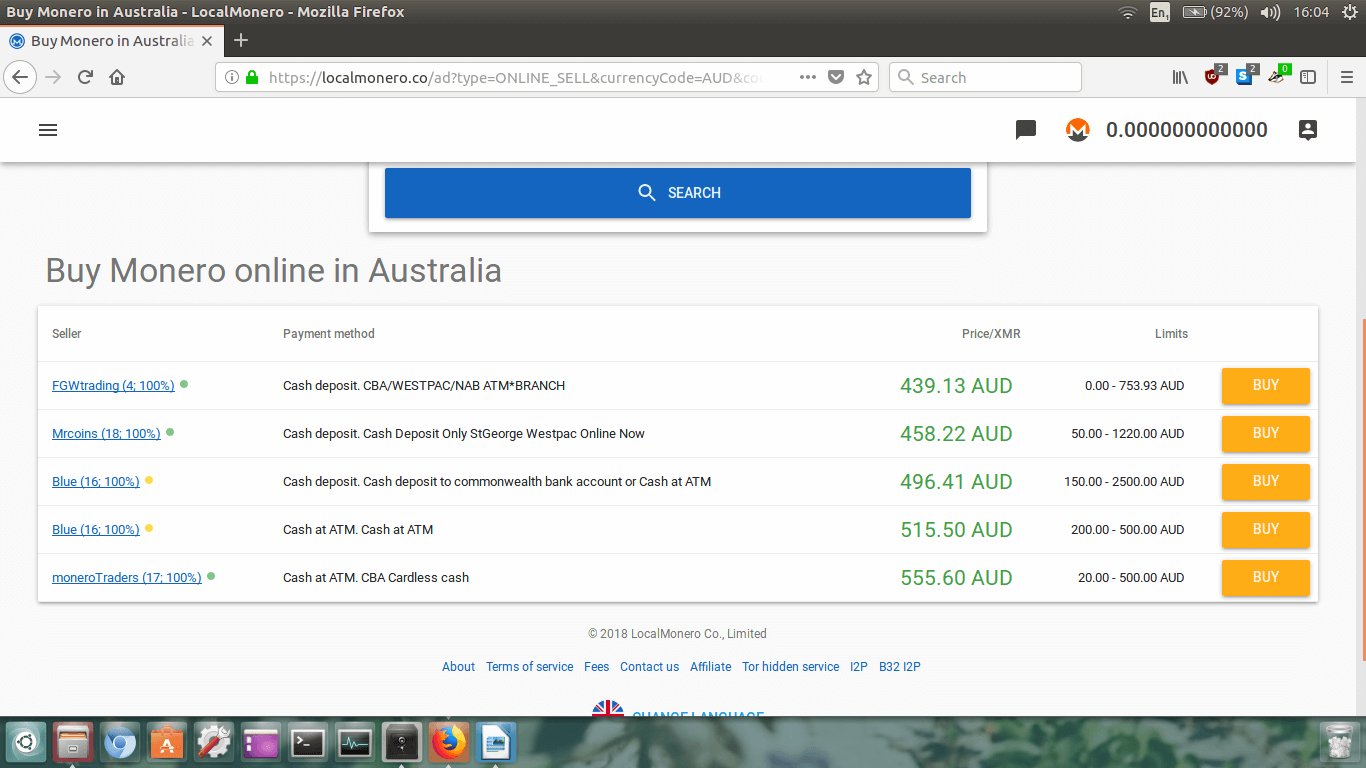
Now I’ve scrolled down I can see all the listings available. There don’t appear to be a whole lot of
users selling Monero in Australia at the moment.
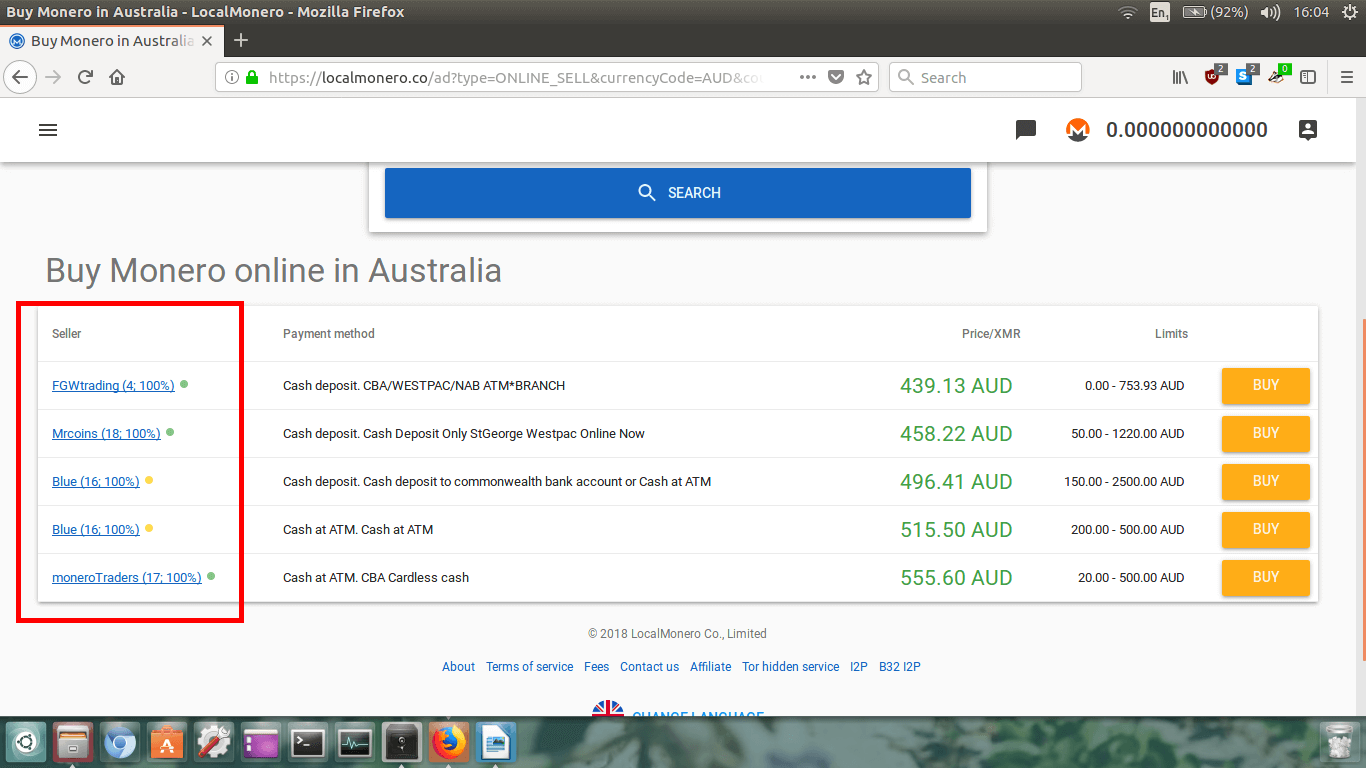
On the left, we can see the seller’s name along with an eBay style seller rating. This is important
to check as we want to buy off someone who is reputable, and is going to conduct business quickly.
In the above image we can see that seller FGWtrading has made 4 transactions and has a 100% rating.
I’d suggest only dealing with sellers who have 100% ratings.
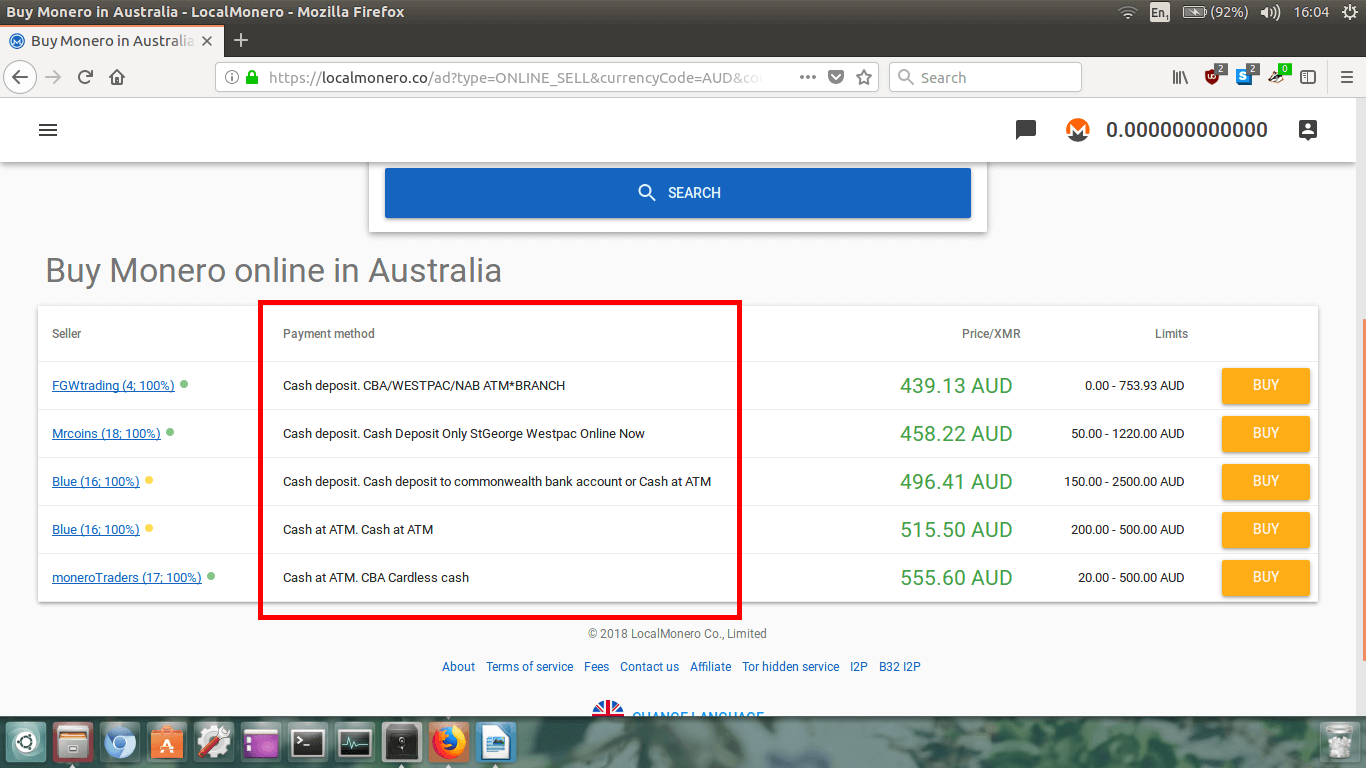
After that we can see the payment methods the seller accepts. FGWtrading accepts cash deposit at a
variety of different Bank’s ATMs and branches.
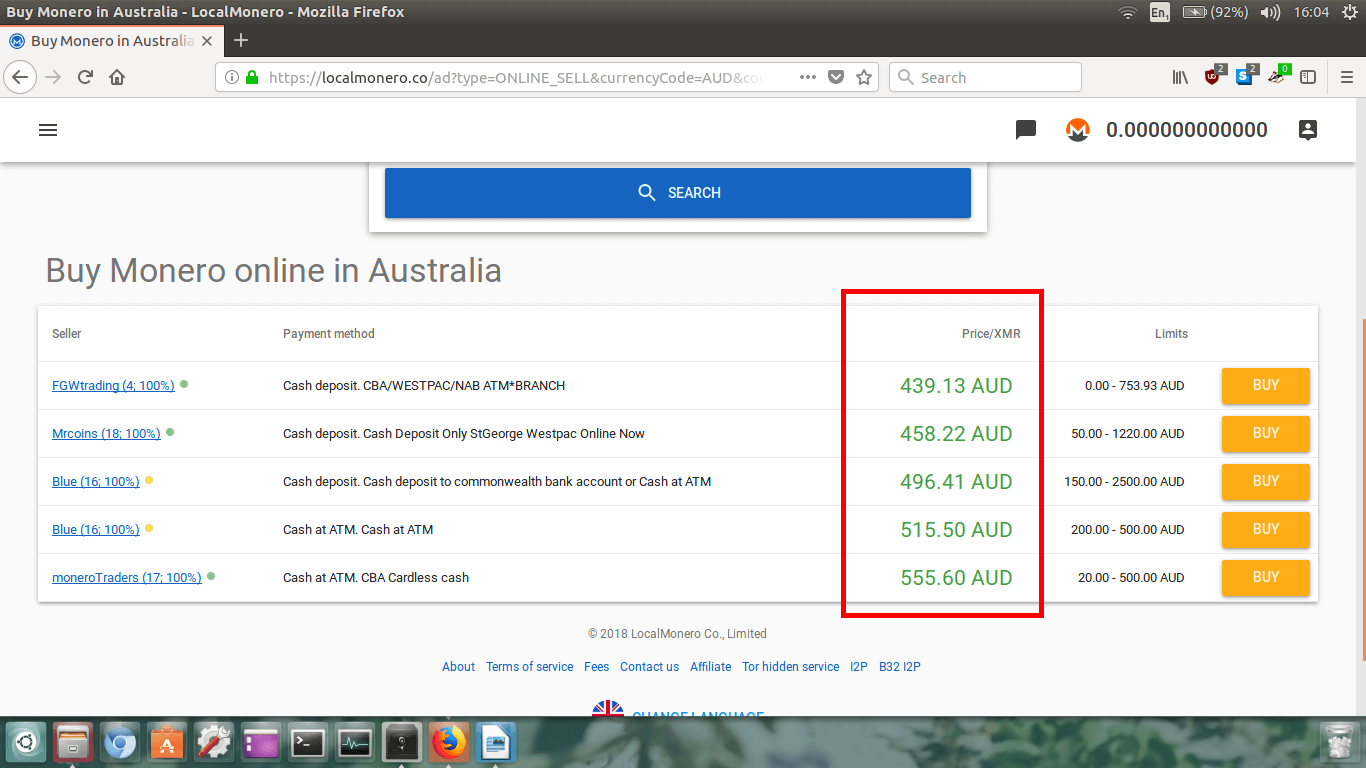
The third thing we need to look at is the price per XMR. The cheapest is listed first. FGWtrading is
selling Monero for $439.13AUD per XMR. This is cheaper than all the other sellers listed.
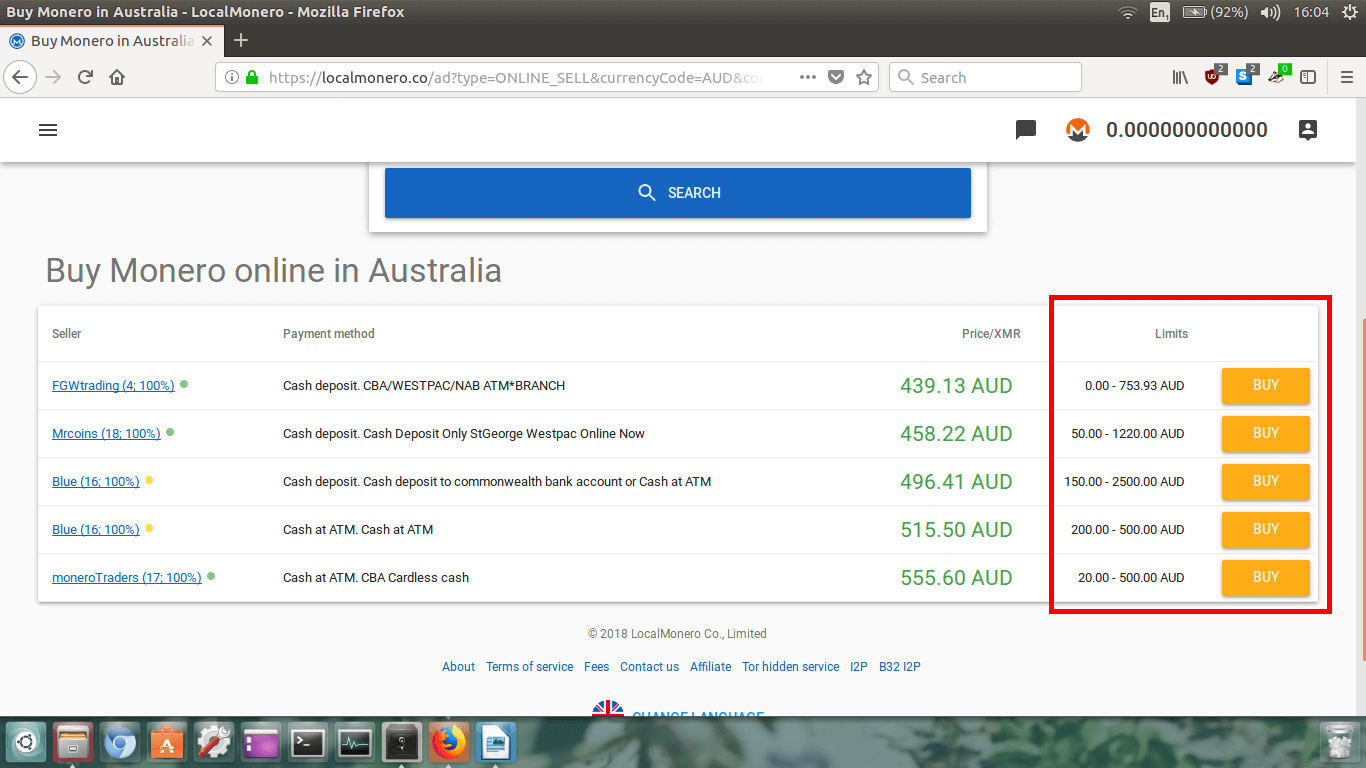
Finally, we need to look at the
Limits. This is the amount of
dollars per transaction we can make with the seller. In my case here, FGWtrading will sell anywhere
from $0 to $753.93AUD worth of Monero per transaction. This is ok for me as I do not want to buy a large
amount, however if I wanted to buy over $1000AUD worth, then the only two sellers offering limits
over $1000 are Mrcoins and Blue, and it may be most convenient to buy from them.
Great. So now I’ve looked at all the sellers ratings, their payment methods, their price per XMR,
and their limits of how much I can buy, I need to decide who to buy from.
I only want to buy $50 worth of XMR, so I must buy from either FGWtrading, Mrcoins, or moneroTraders
because the other two sellers have higher limits.
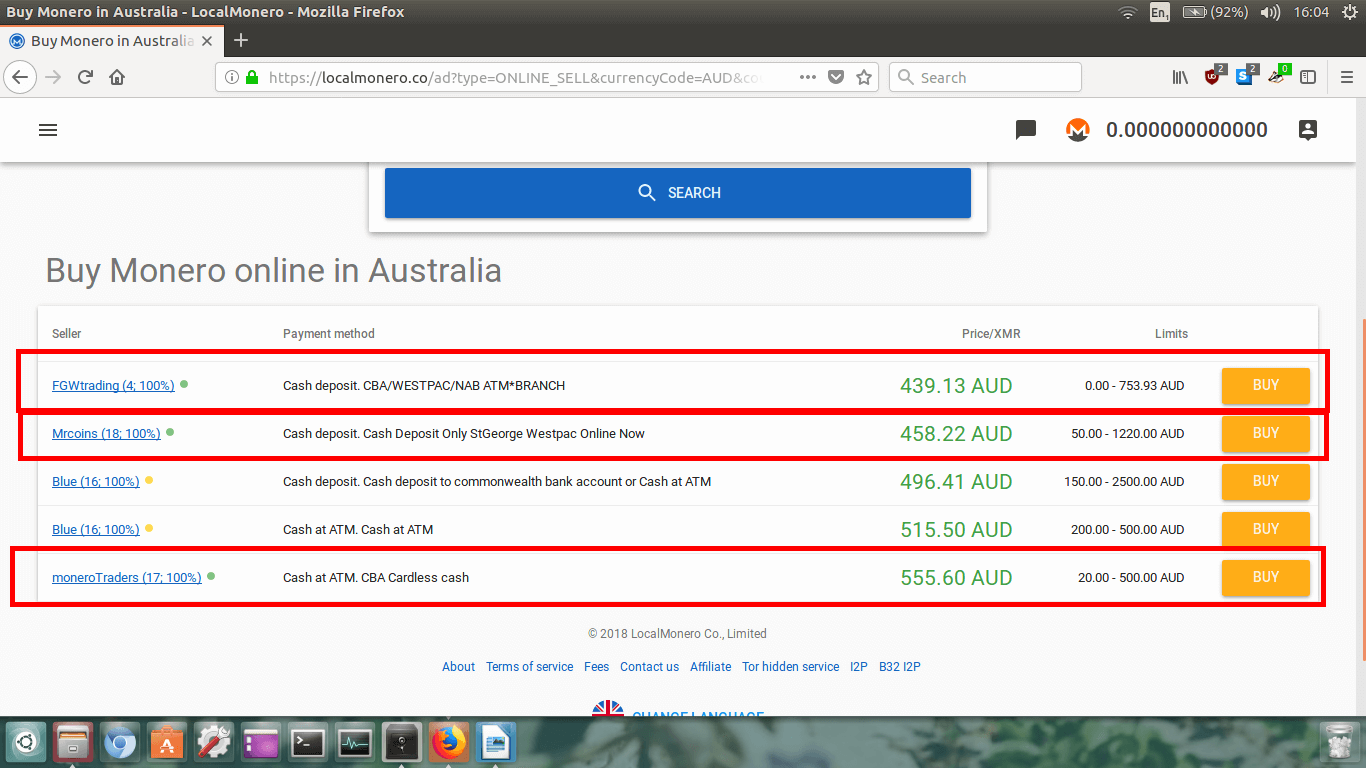
Out of those three, FGWtrading has a lower number of ratings compared to Mrcoins and moneroTraders,
however FGWtrading is considerably cheaper and still has a 100% rating so I will go with them.
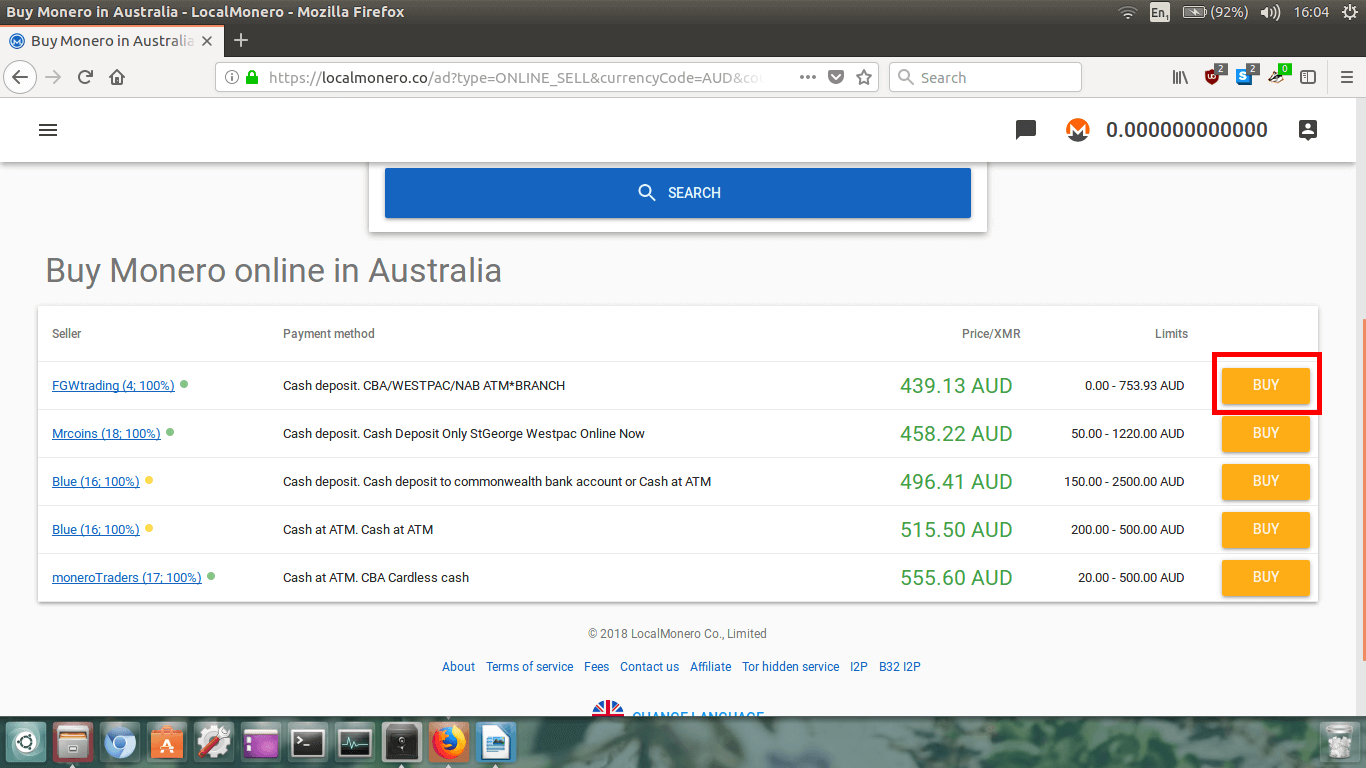
I will choose to buy from FGWtrading now and click the orange
BUY
button next to their listing. Obviously, right now you will be buying your Monero from a different vendor,
so use my advice above to choose a good seller that suits your needs, and click their
BUY button.
Step 6.
Now, the seller’s page will load up.
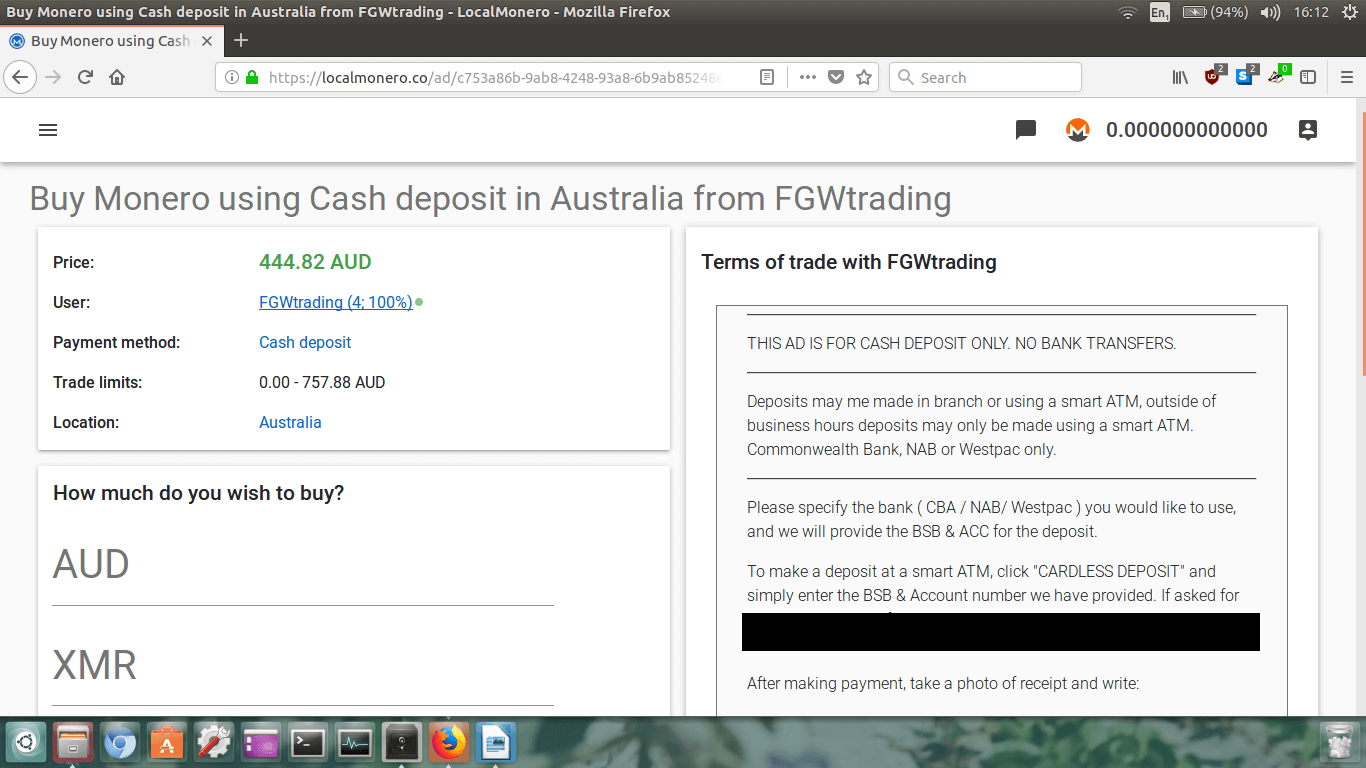
In the top left section, we can see the seller’s information like on the previous page. In my case,
you will see that the price has slightly increased to $444.82AUD. This is because like all
cryptocurrencies, Monero’s price is highly volatile and a 5% swing in price within 15mins is not unusual.
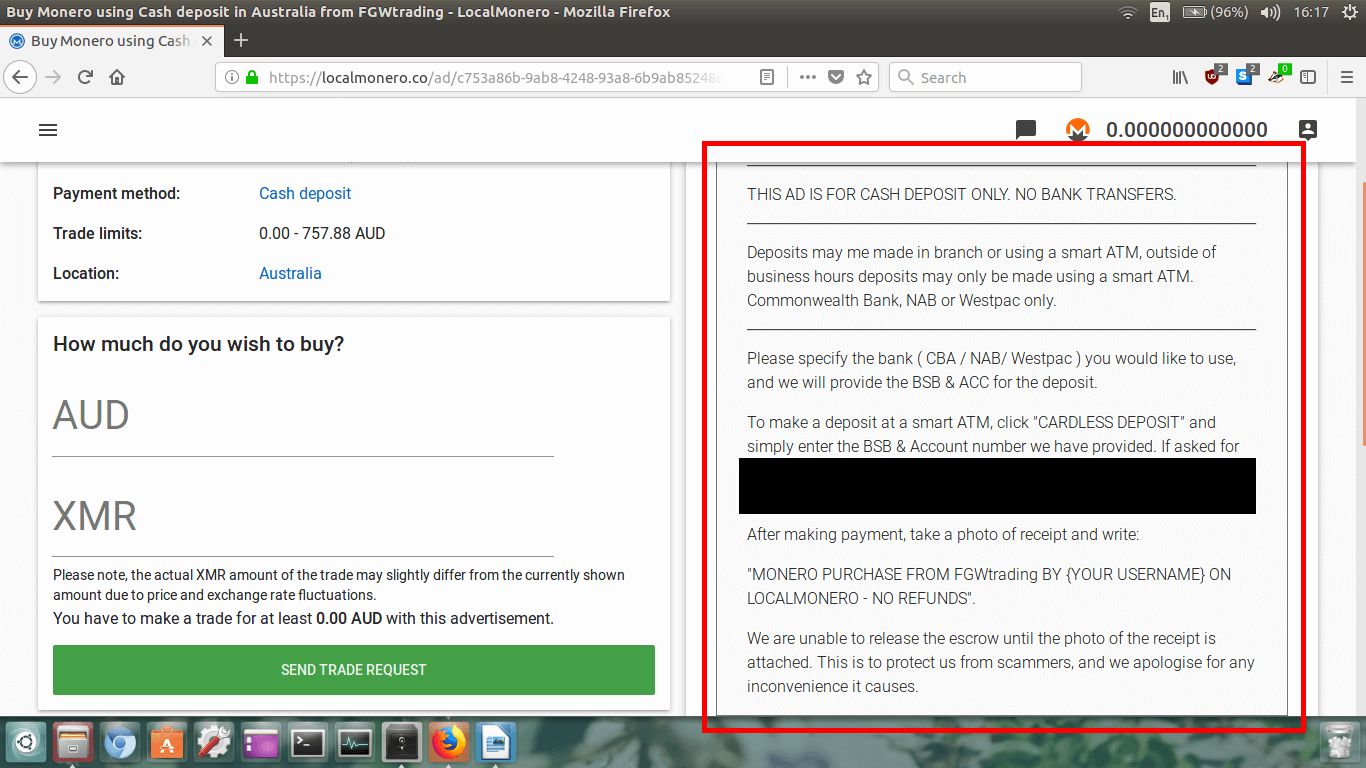
Now you need to double check the seller’s
Terms of trade on the
right hand side of the screen. Check that you are happy to pay using their method.
In my case here, I will have to deposit the cash in at an ATM using the seller’s account details which is
OK with me.
Your payment method may be different here, so again, just make sure it is something you are happy doing.
If you’re unsure about any of this, just contact the seller and ask them to clarify the payment method.
Once you have checked the seller’s
Terms of trade, and understand
how you are making the payment, and are ok with everything, type in the amount of XMR you want to buy.
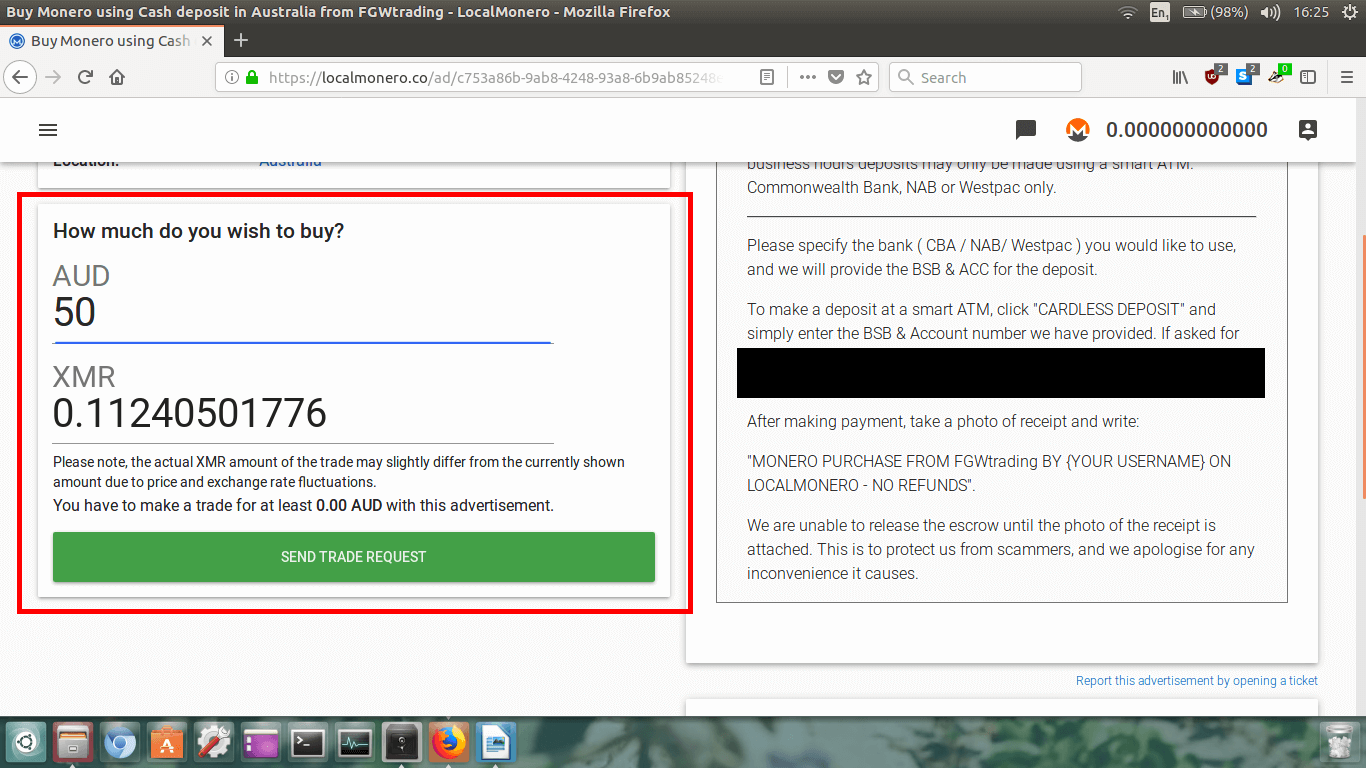
I want to buy $50AUD worth of Monero so I just typed in 50. It automatically loads up how much Monero
you will receive from that seller.
This all looks good to me, so I will now click the big green button that says
SEND TRADE REQUEST.
Step 7.
Now a new page will load up detailing the transaction.
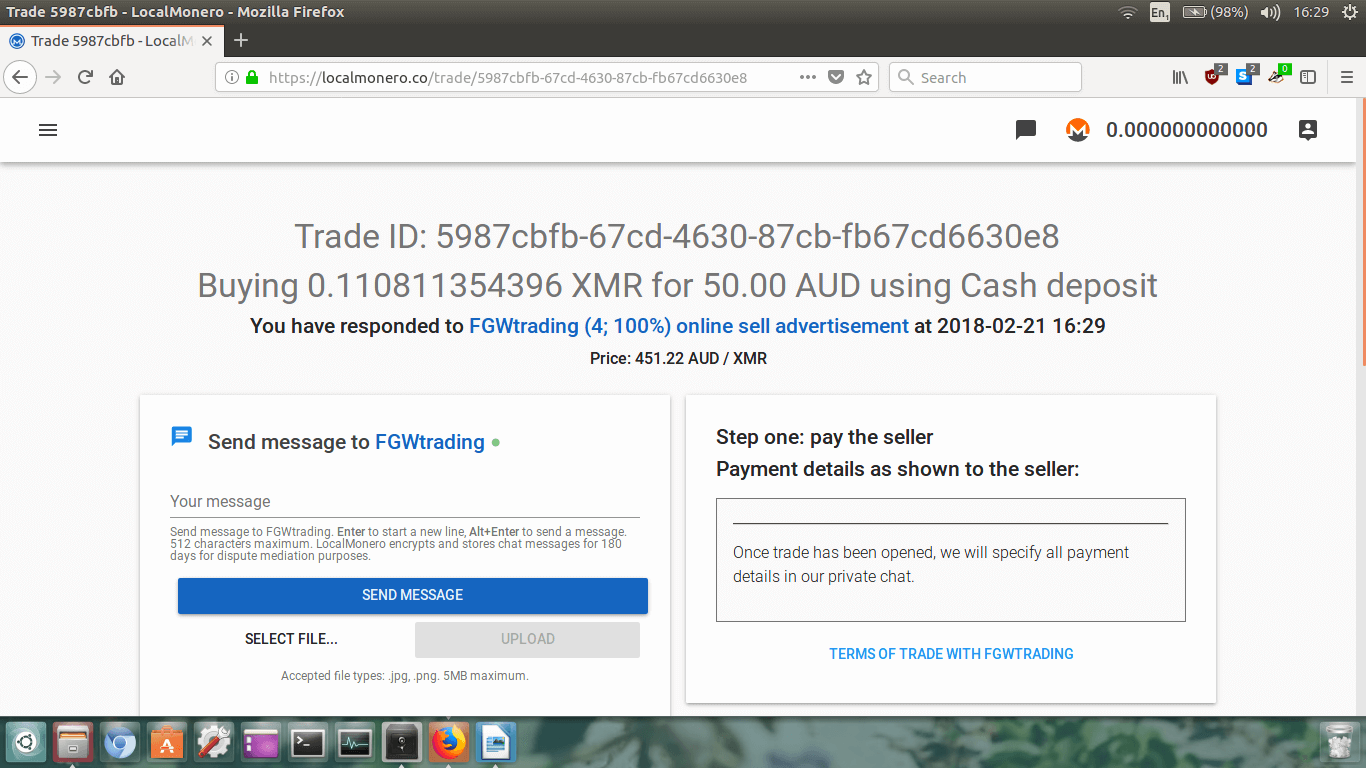
Again, I can see that the amounts have changed due to the volatility in price. I should have been quicker
and I would have gotten a little more XMR! Anyway, it doesn’t really matter, I just need my Monero ASAP!
First off, I need to adhere to the seller’s
Terms of trade that I
read on the previous screen, and message them to obtain their banking details so I can make the correct
payment. Remember, you should also contact the seller to confirm payment method and details prior to
making payment!
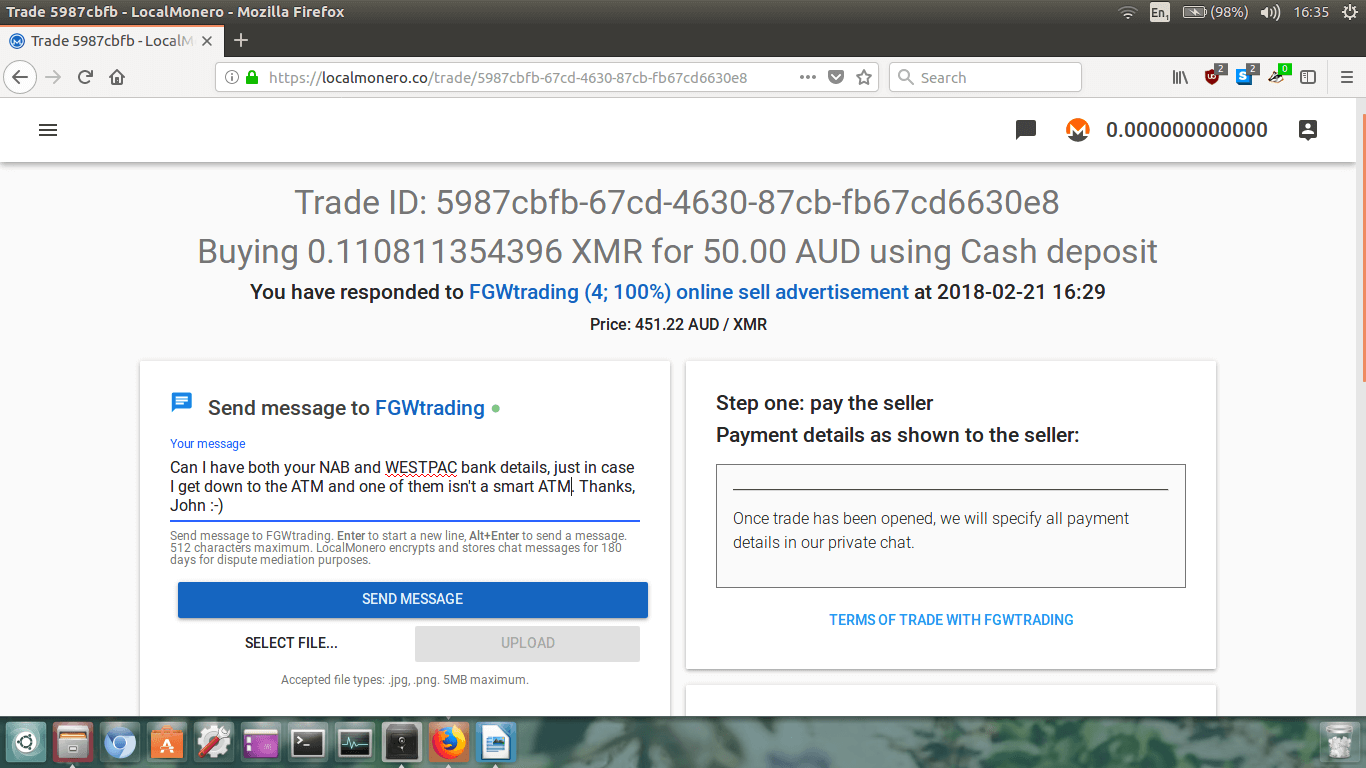
Type your message in the box if you need to contact the seller and click the big blue
SEND MESSAGE button.
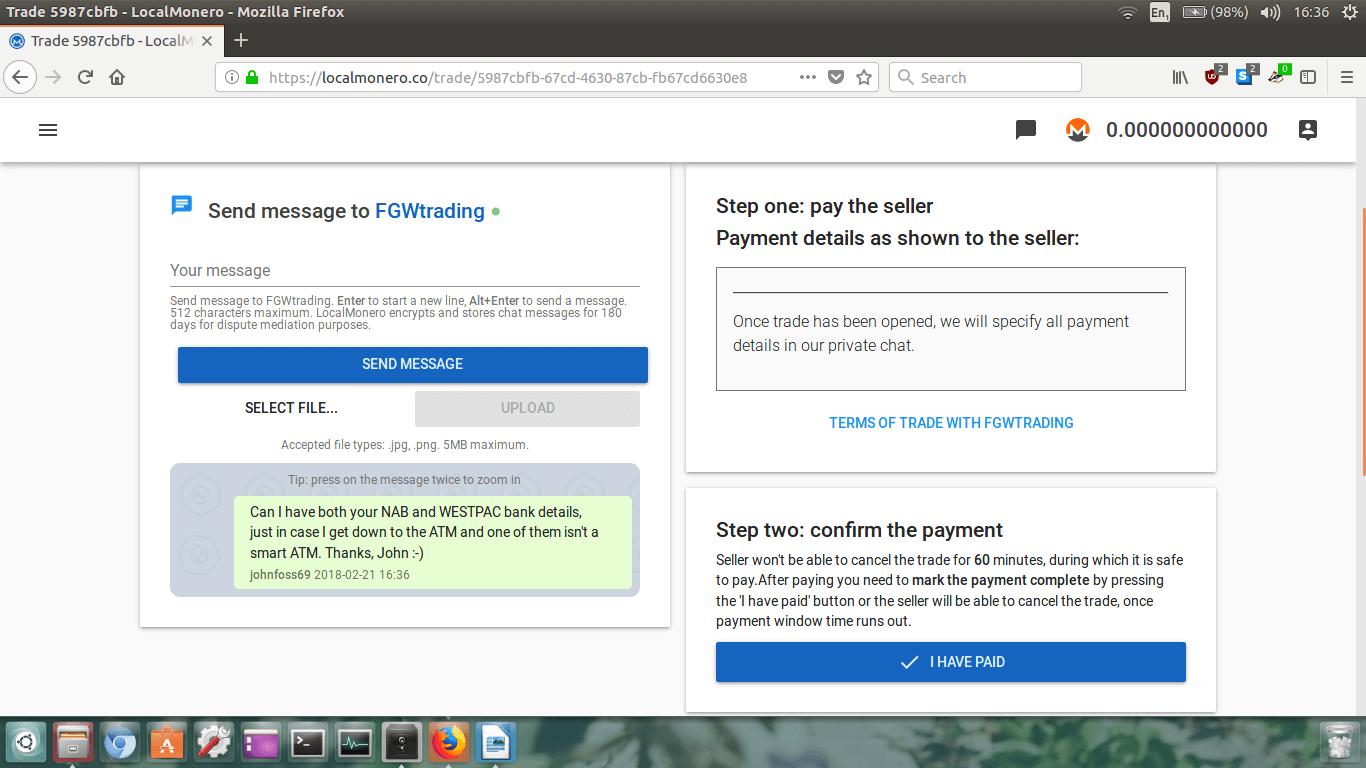
Once it has sent you will see a record of your sent message in a chat box just below where you typed
it in.
Now I have to wait for the seller to reply and give me their banking details so I can make the payment.
I have no idea how long it will take for the seller to respond. It might even take up to 24 hours! In the
meantime I’m just going to drink a beer and head over to reddit.com/r/moonero for a few laughs.
Side note: If the seller isn’t responding, you can always cancel
the trade and make another order with a different seller. Just remember, do not cancel a trade if you have
already paid the seller!
Step 8.
Finally the seller replied and sent me their banking details and I made the payment. Remember, your
seller may accept different payment methods, so this part may be a little different for you if you are
paying with cash in person, or are bank transferring the money to them.
Now we’ve paid, we need to confirm this on LocalMonero.
Make sure you’re back on the transaction page again. You might have to log back in to LocalMonero.
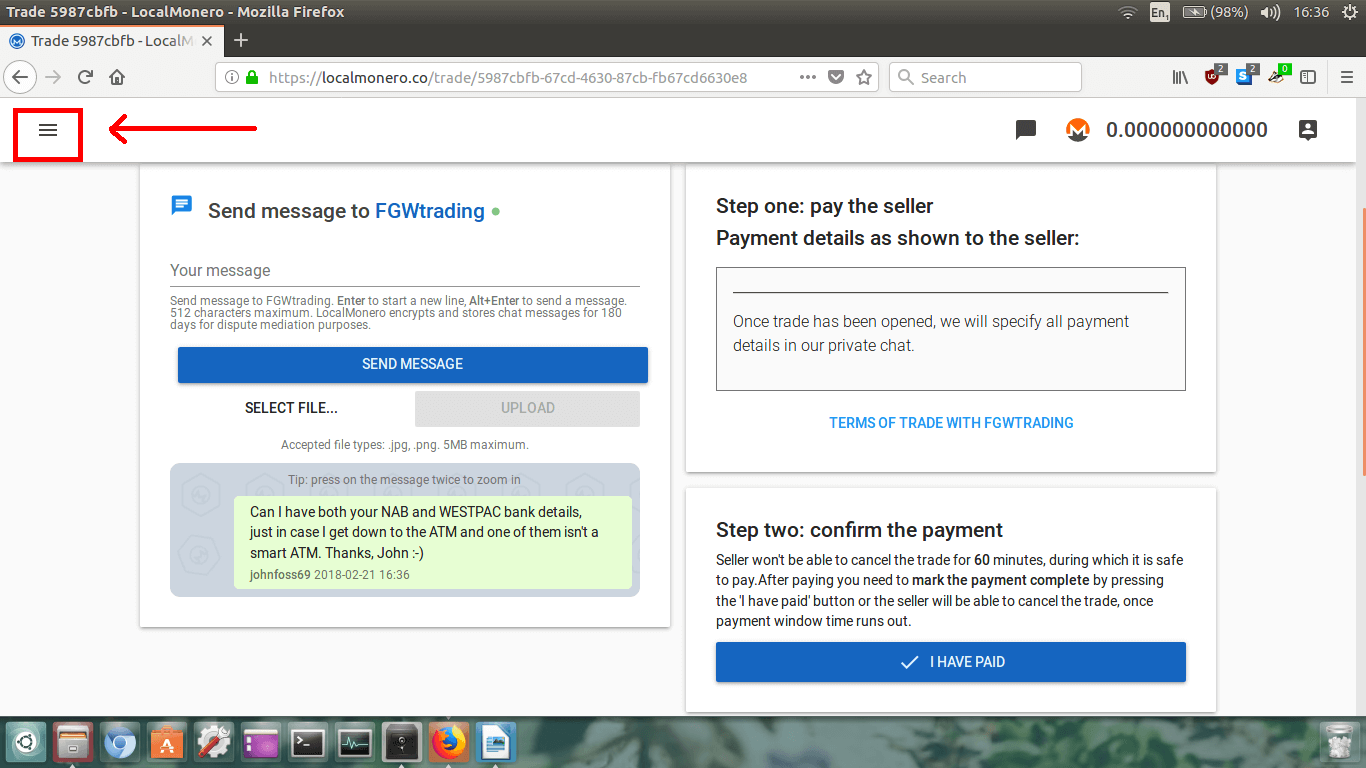
Log back in, and click the three lines in the top left corner to open the left sidebar menu.
And then click on
Dashboard.
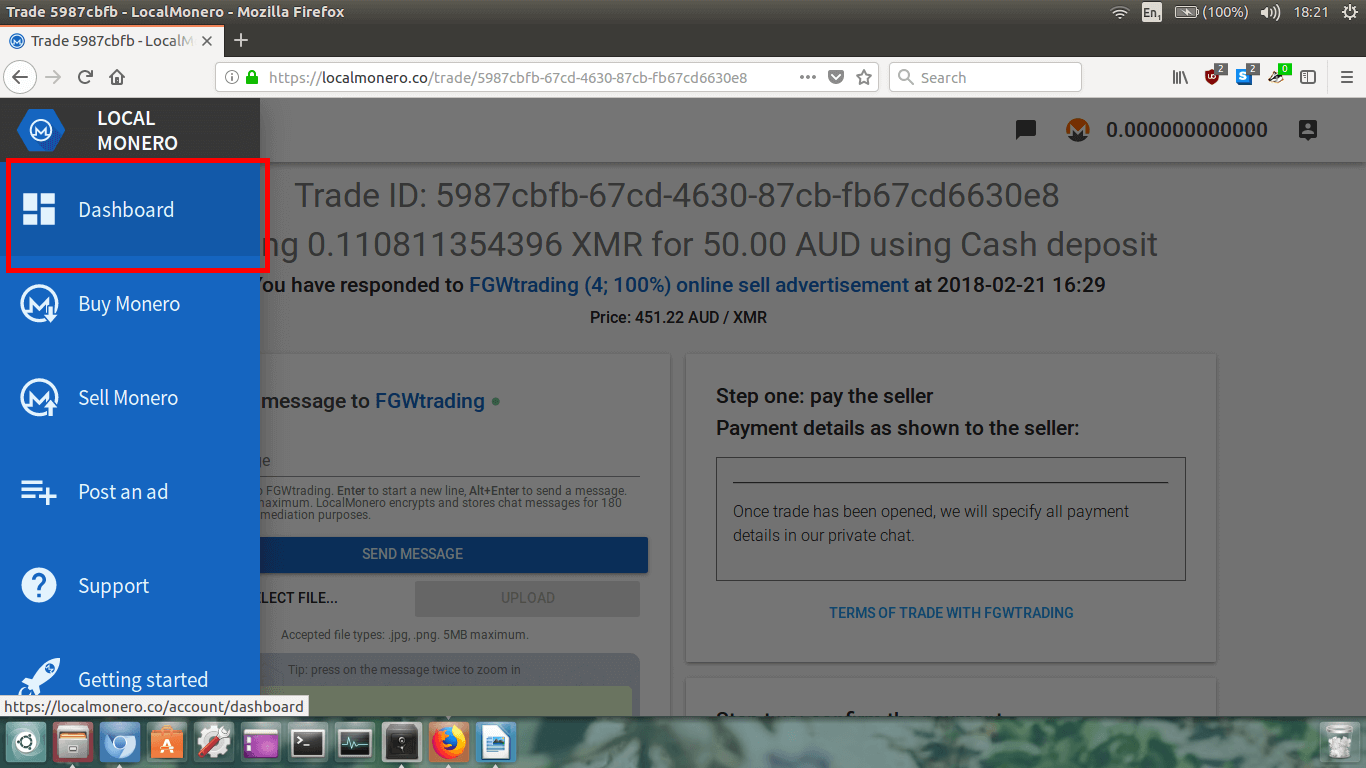
Easy! Now you will see your Dashboard.
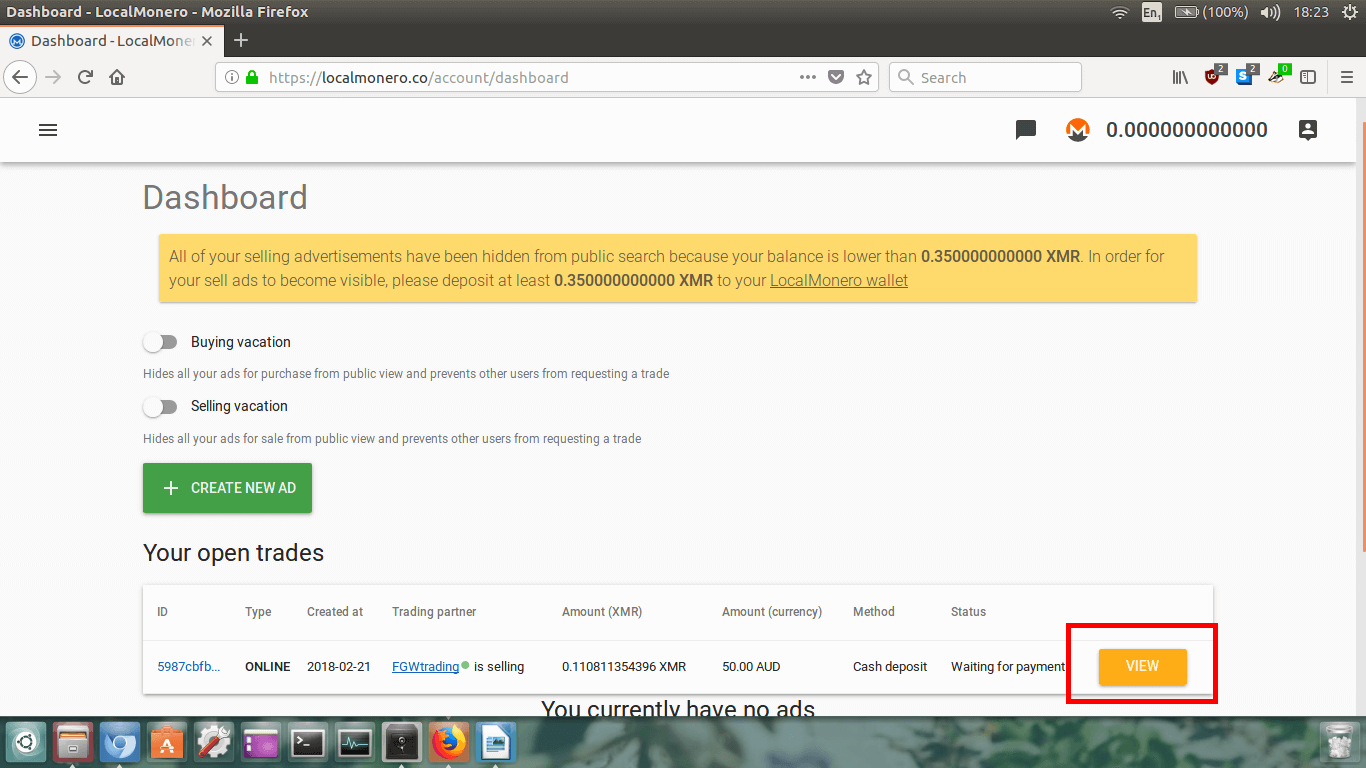
To return to the open trade, just click on the orange
VIEW button.

Scroll down to where it says
Step two: confirm the payment.
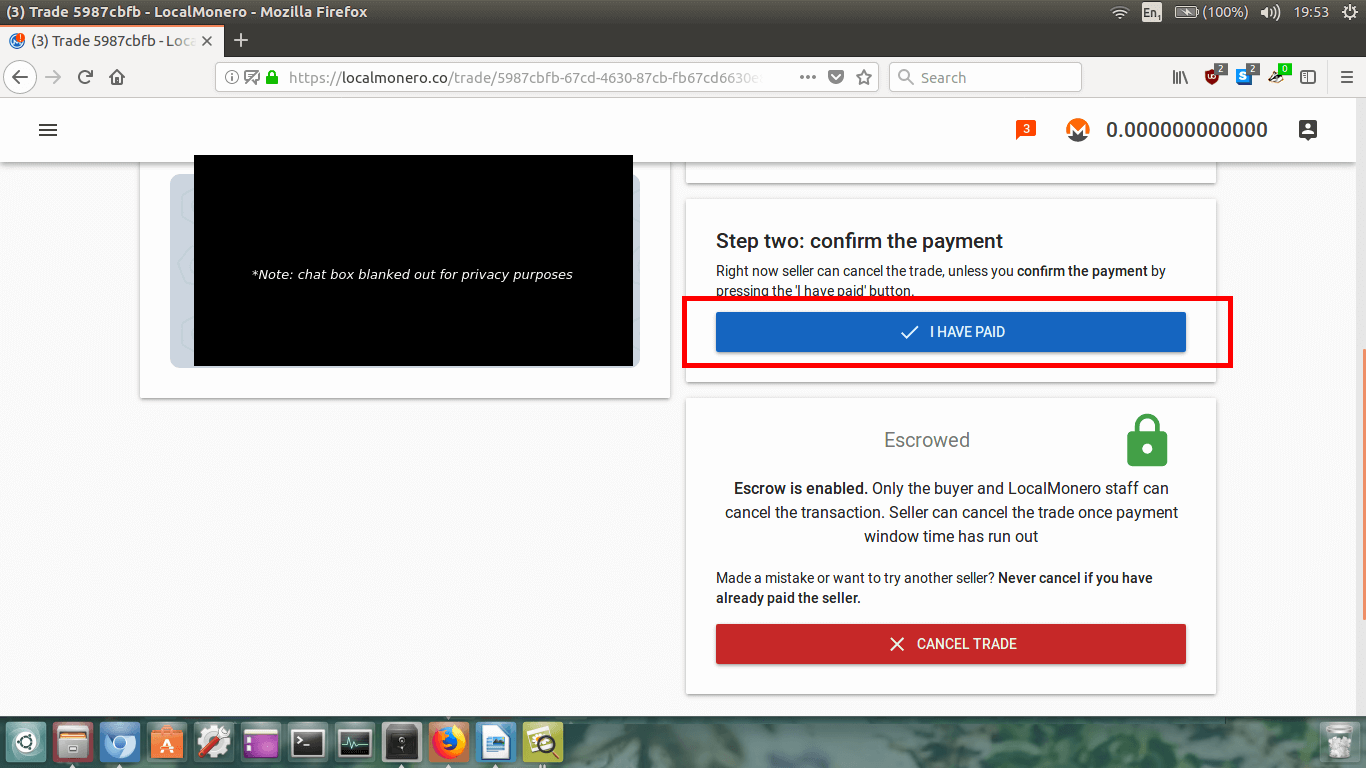
Now that we’ve paid, click the big blue
I HAVE PAID button.
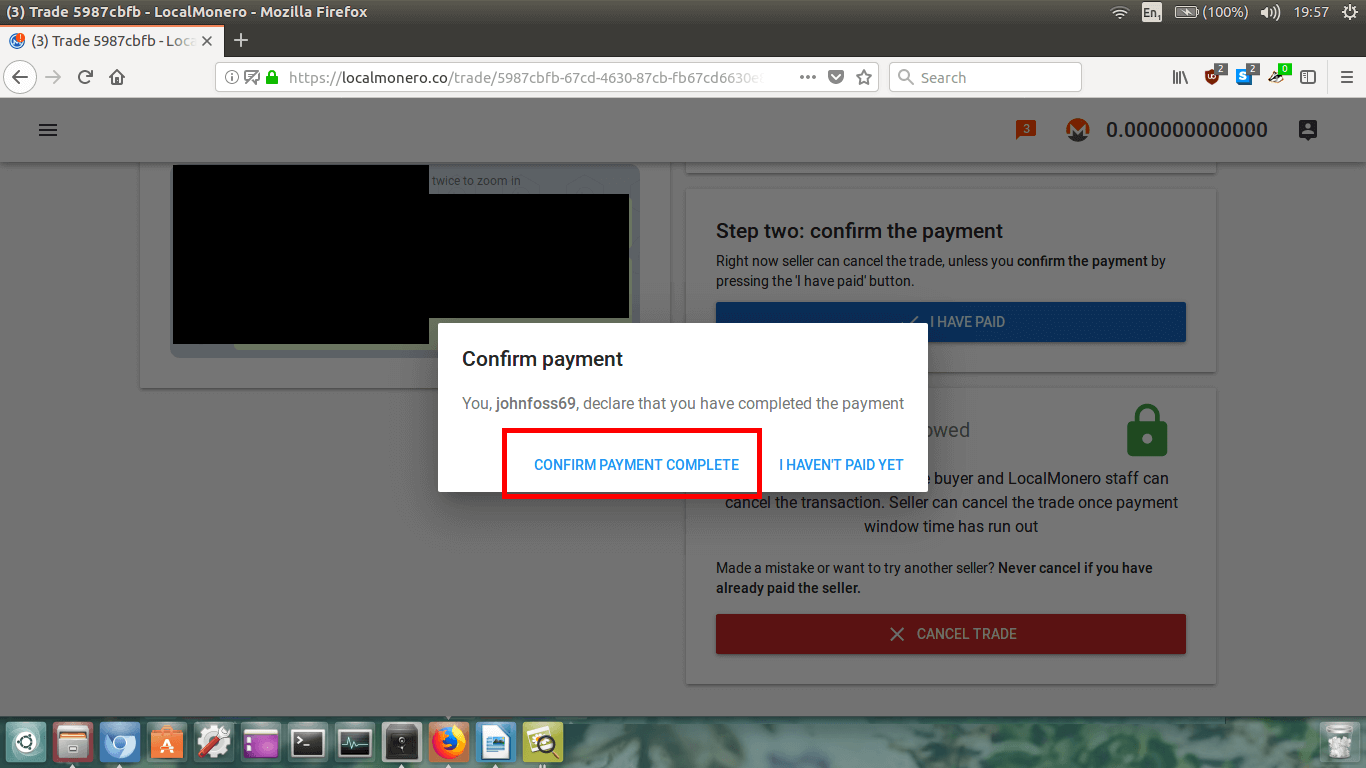
Now we have to confirm the payment. Click
CONFIRM PAYMENT COMPLETE.
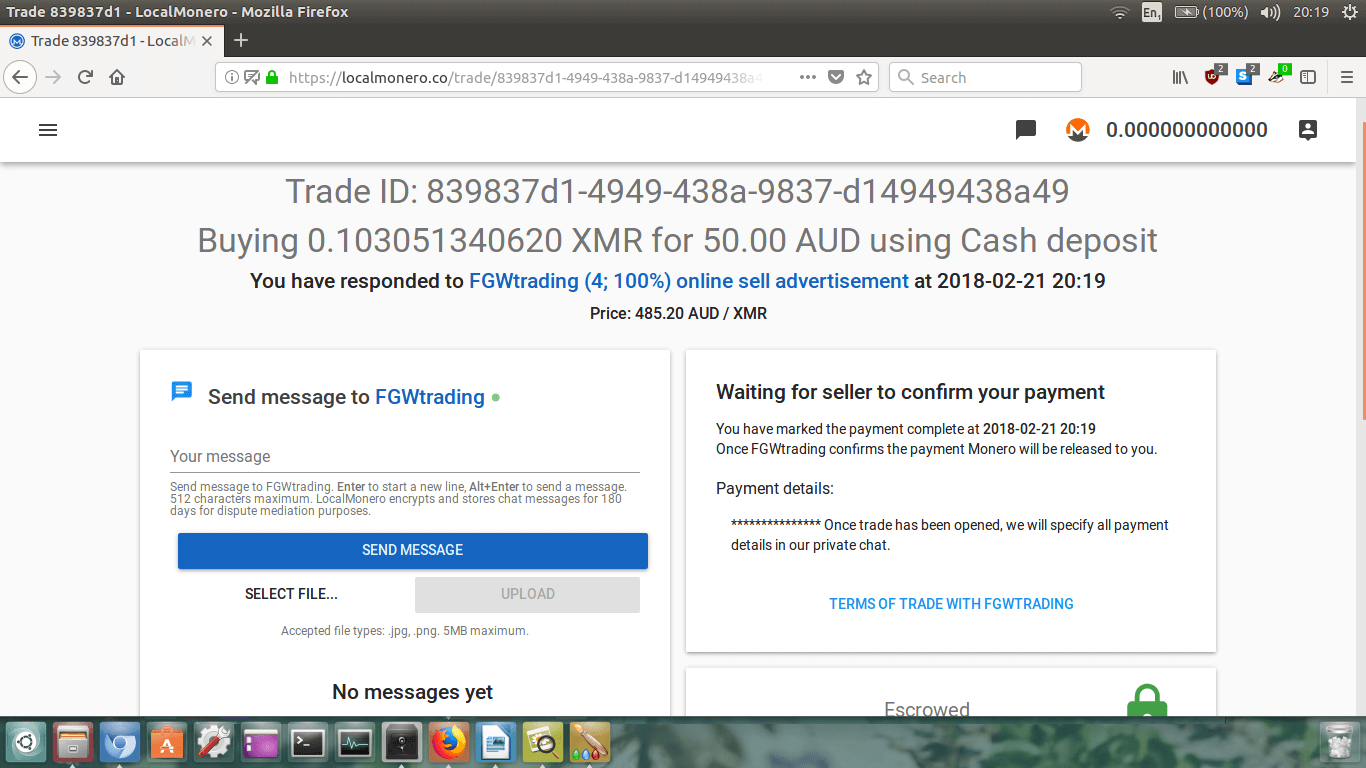
Easy! Now we just wait for confirmation from the seller! Time to grab another beer and relax until it is
cleared.
If you haven’t paid in person using cash, then you are going to have to wait for the traditional banking
system to forward your payment to the seller. This is usually between 1 to 3 business days depending on
which country you are in, so sit tight and wait patiently for the seller to confirm they’ve received the
money. If this is the case just log back in later and check the status of the trade.
Step 9.
Ok, so it’s been two days and I think the bank transfer will have cleared by now. When you think the
payment has been received, go back to LocalMonero and log back in to your account.
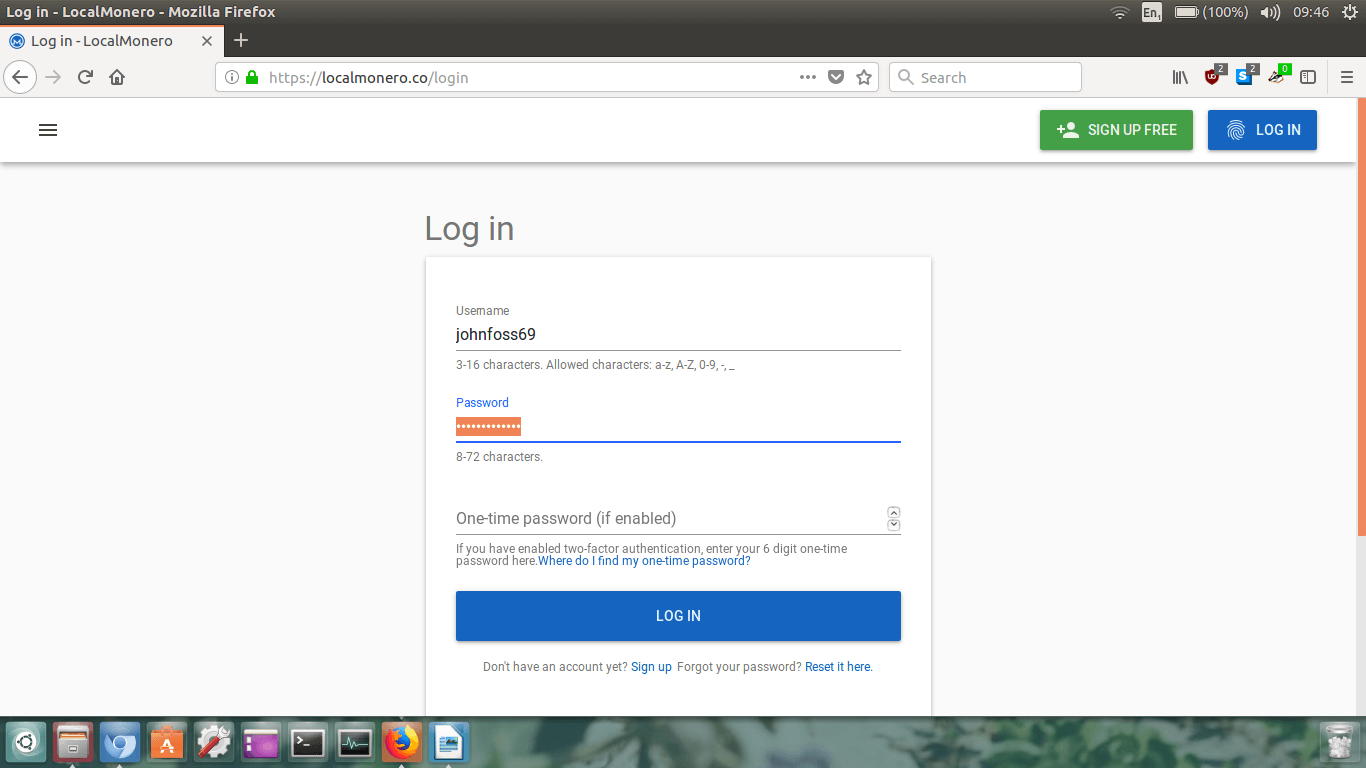
Once you’re logged back in, check up in the upper right hand corner to see if you have any new
notifcations (the notification icon is the little orange speech bubble with the number inside it)
or your XMR balance has changed.
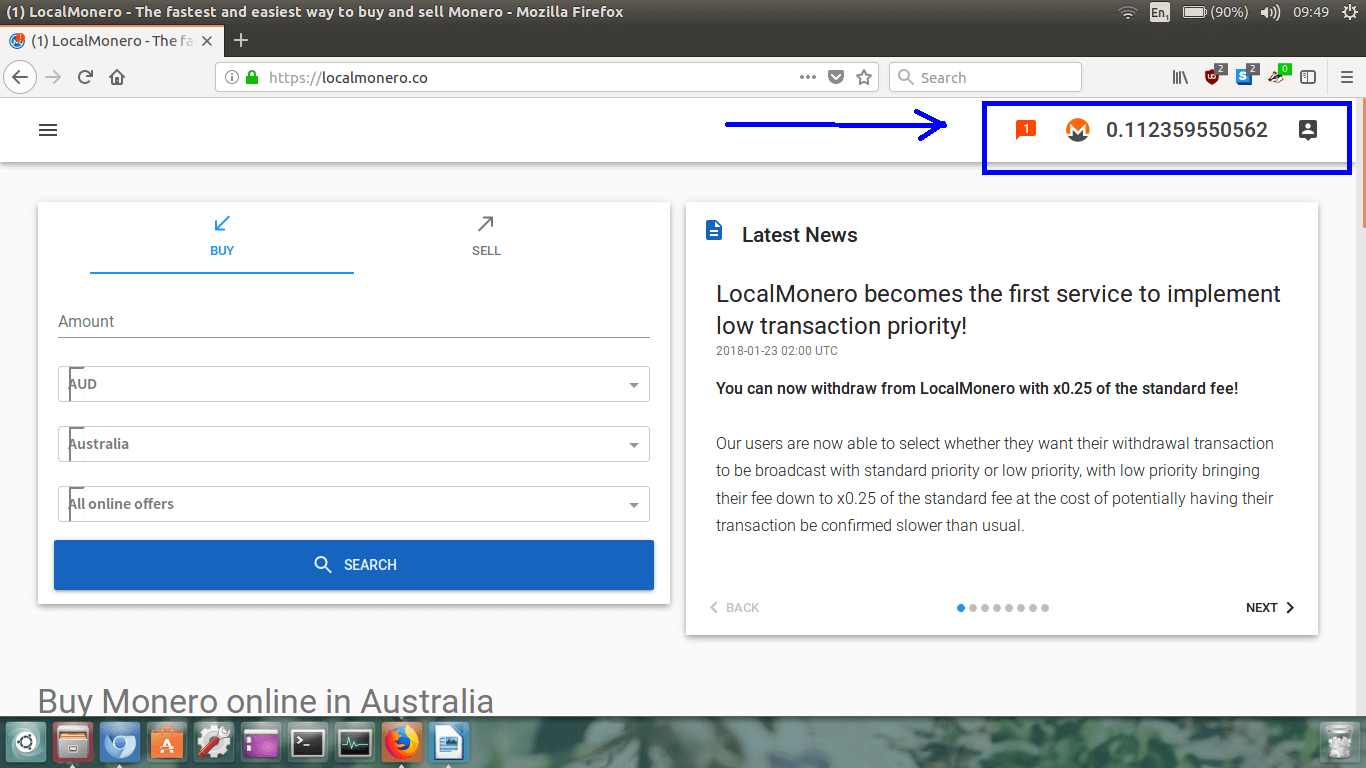
Well fancy that! I’ve got a new notification, and it appears that I have received my Monero!
What we’re going to do now is check the notification by simply clicking on the orange speech box.
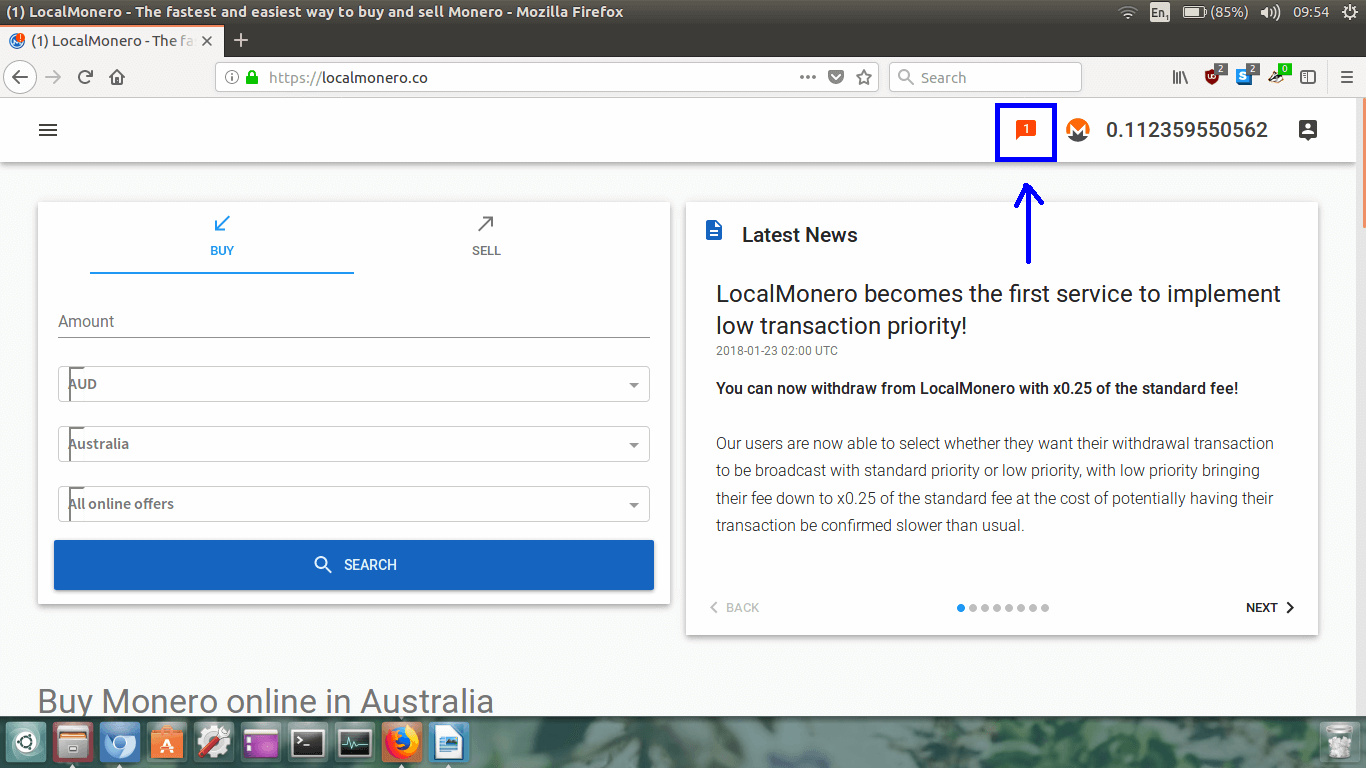
Let it load up.
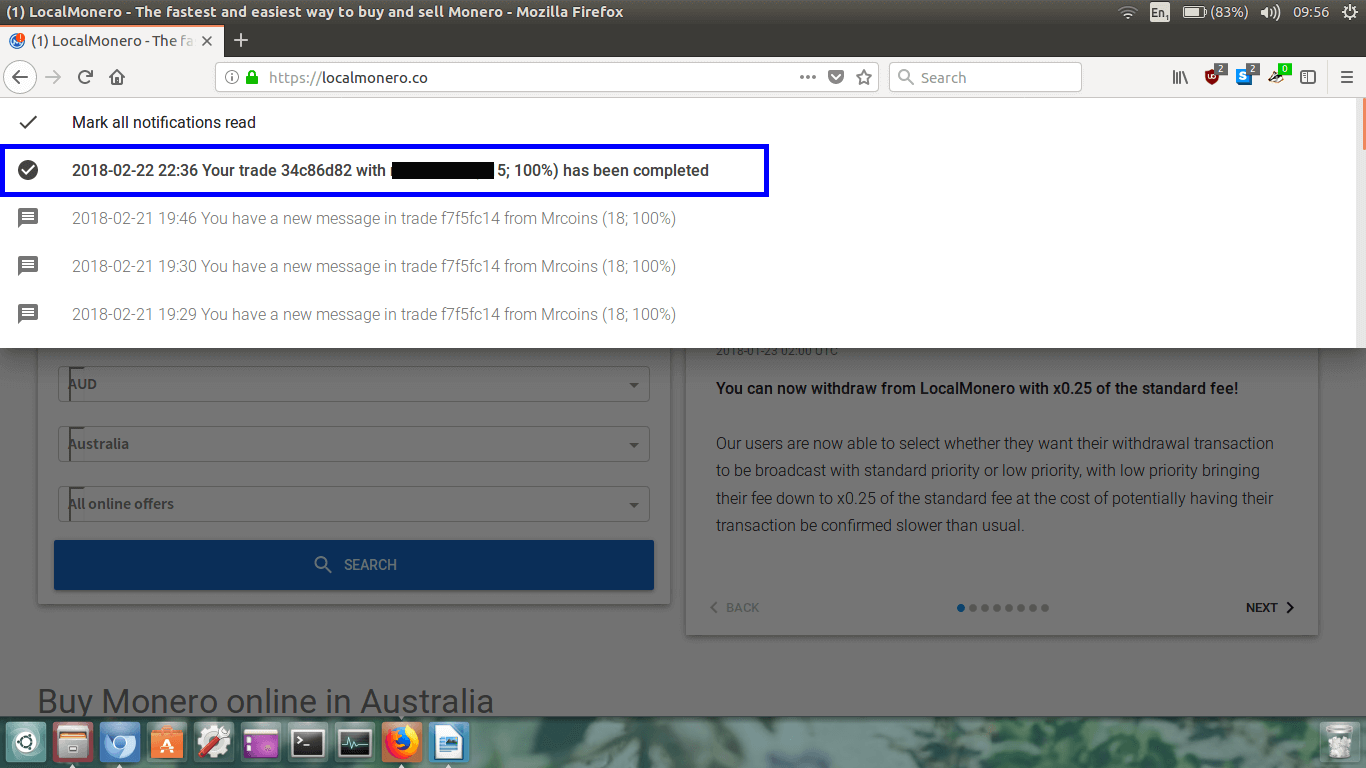
You will now see all your notifications. You can see that I’ve highlighted my completed trade in the
blue box. It should have a tick and say completed. Great!
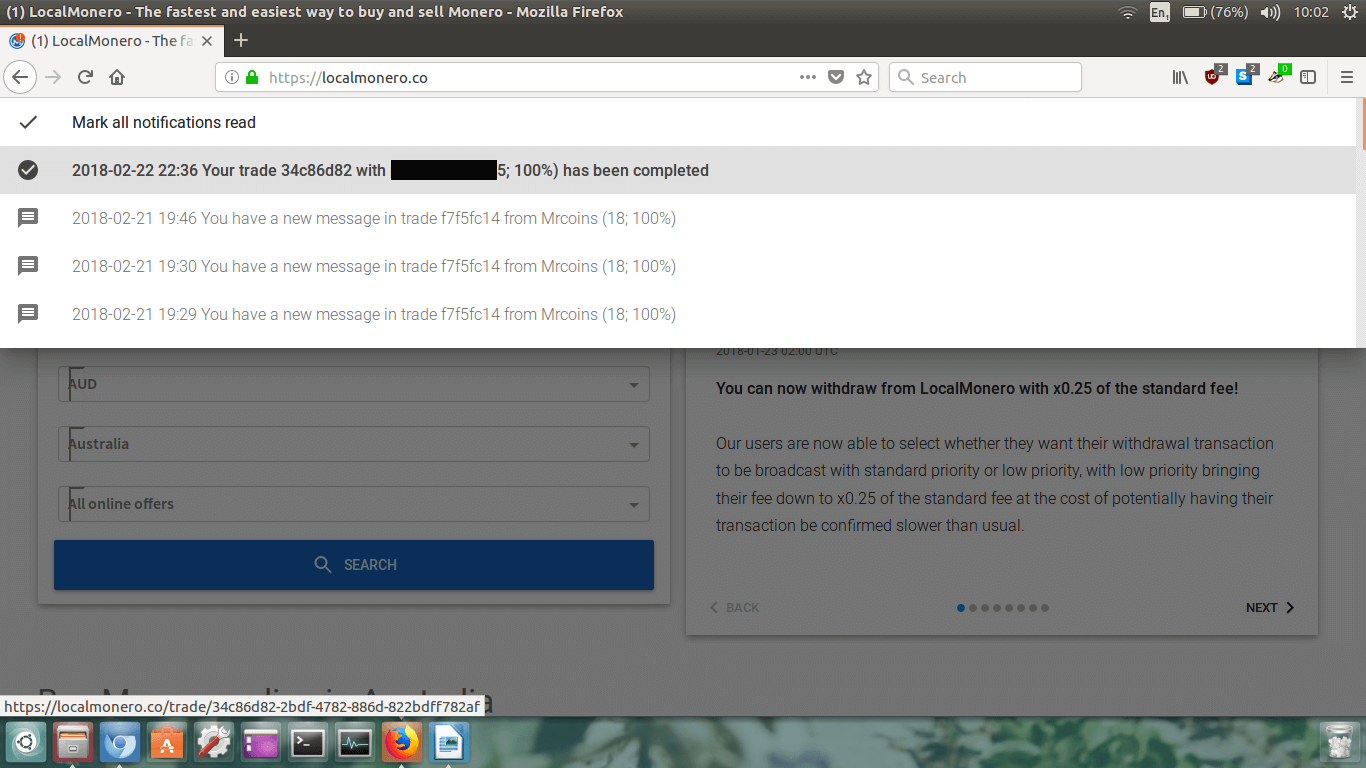
Let’s now click on the completed notification. Put your mouse over the completed notificaiton, wait for
it to highlight itself, and click on it.
Once you’ve clicked it, the trade page will load up again.
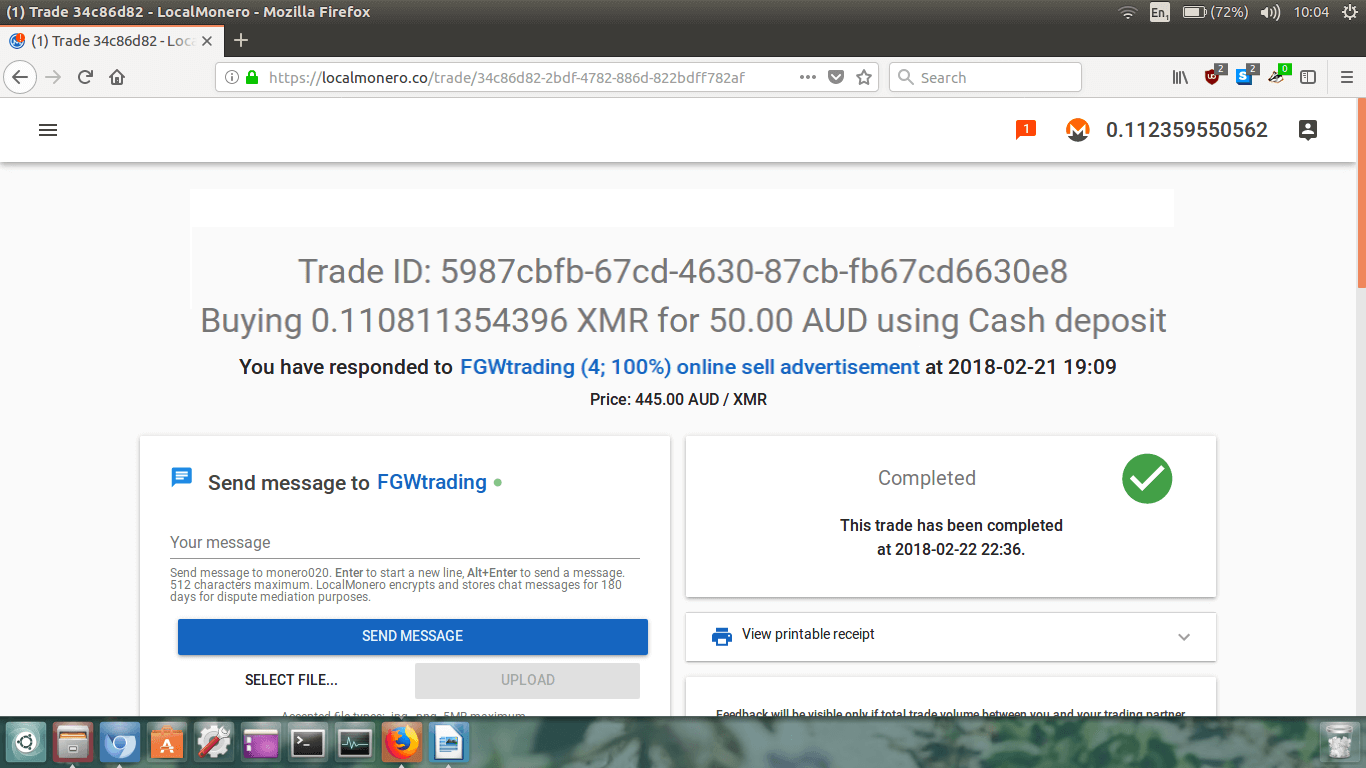
You will see on the right side of the page it will say
Completed
and have a big green circle with a tick in it.
Now let’s scroll down the page a little to see if there’s anything else new.
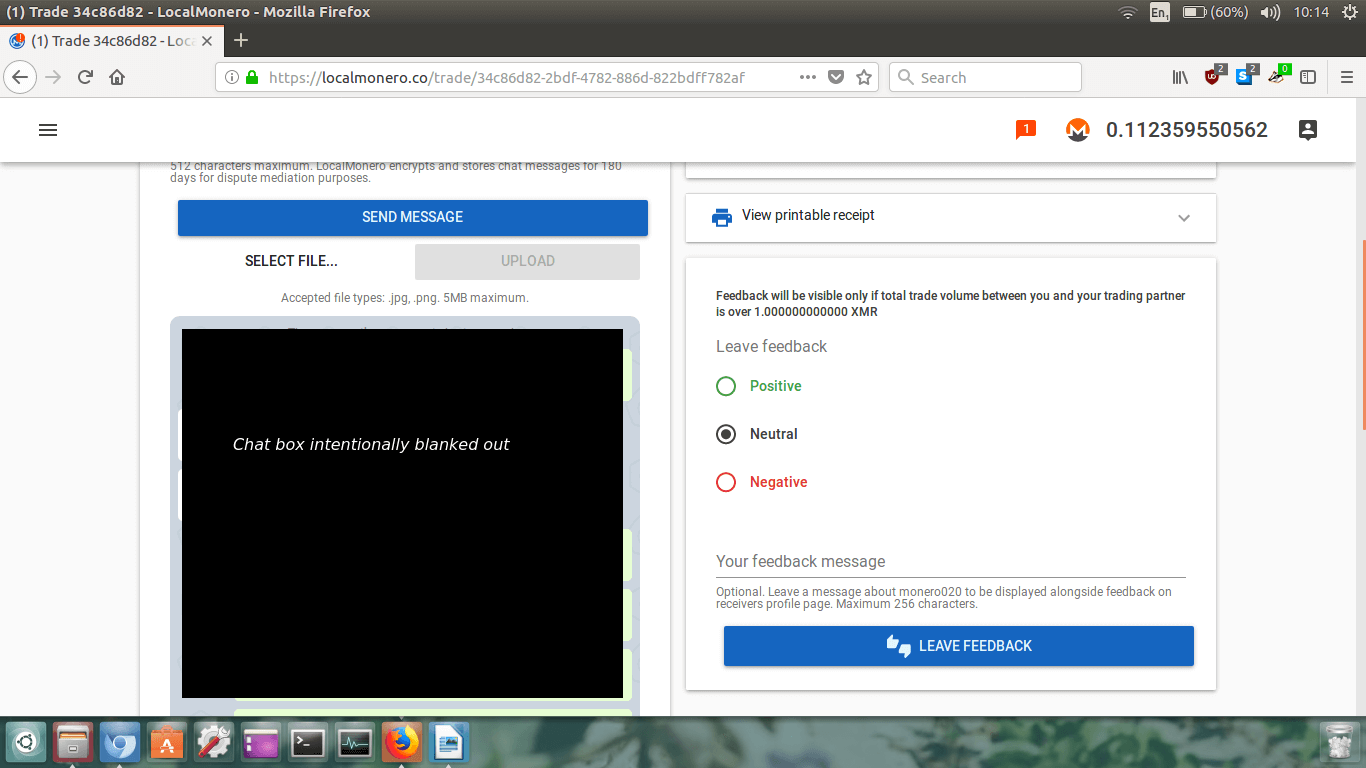
If you want to, you can view and print a receipt of this transaction. This may be handy for future tax
purposes.
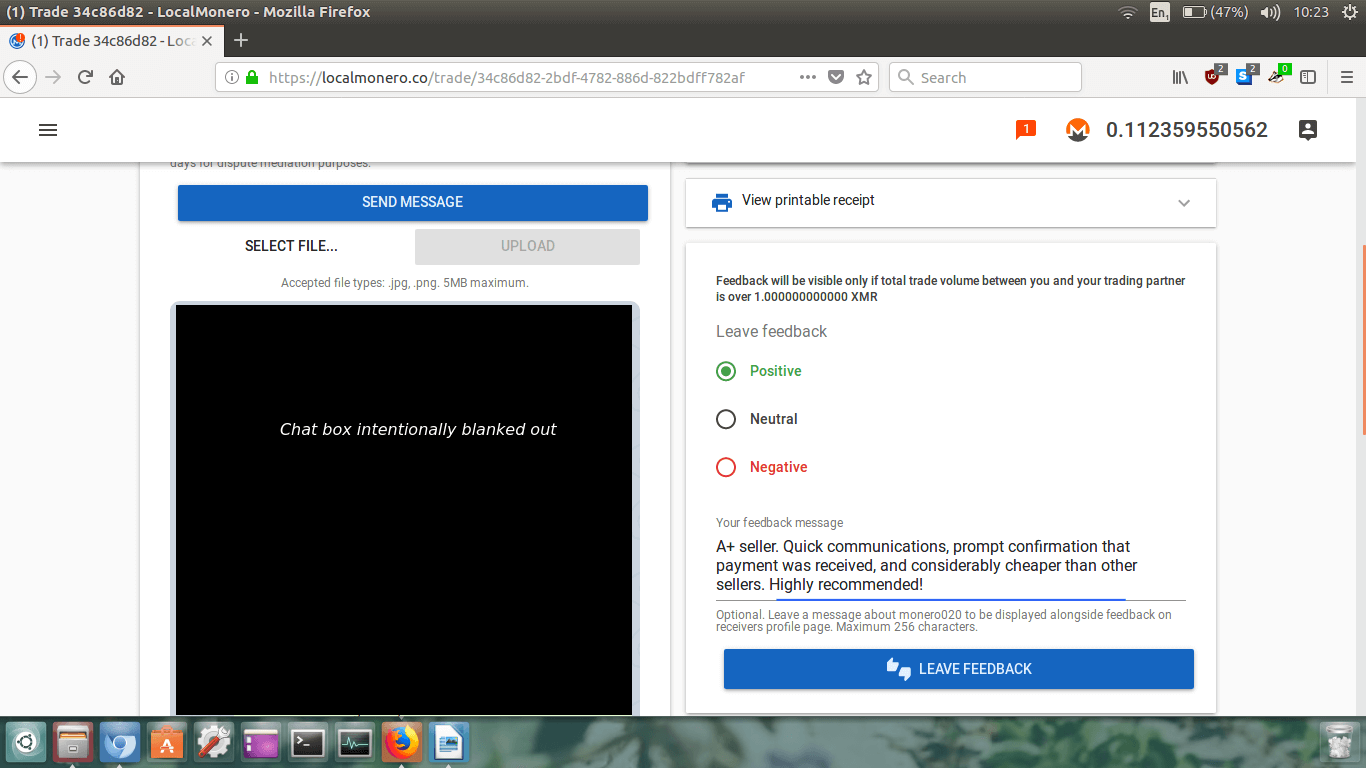
We now also have to leave feedback for the seller. Choose the feedback you wish to give (positive,
neutral or negative), and just like on eBay or Amazon type them a feedback message so that potential
future buyers can refer to it, then click the big blue box
LEAVE FEEDBACK.
The same page will reload itself with the updated feedback.
Step 10.
After the trade page has reloaded itself, click on your XMR balance in the top right corner.
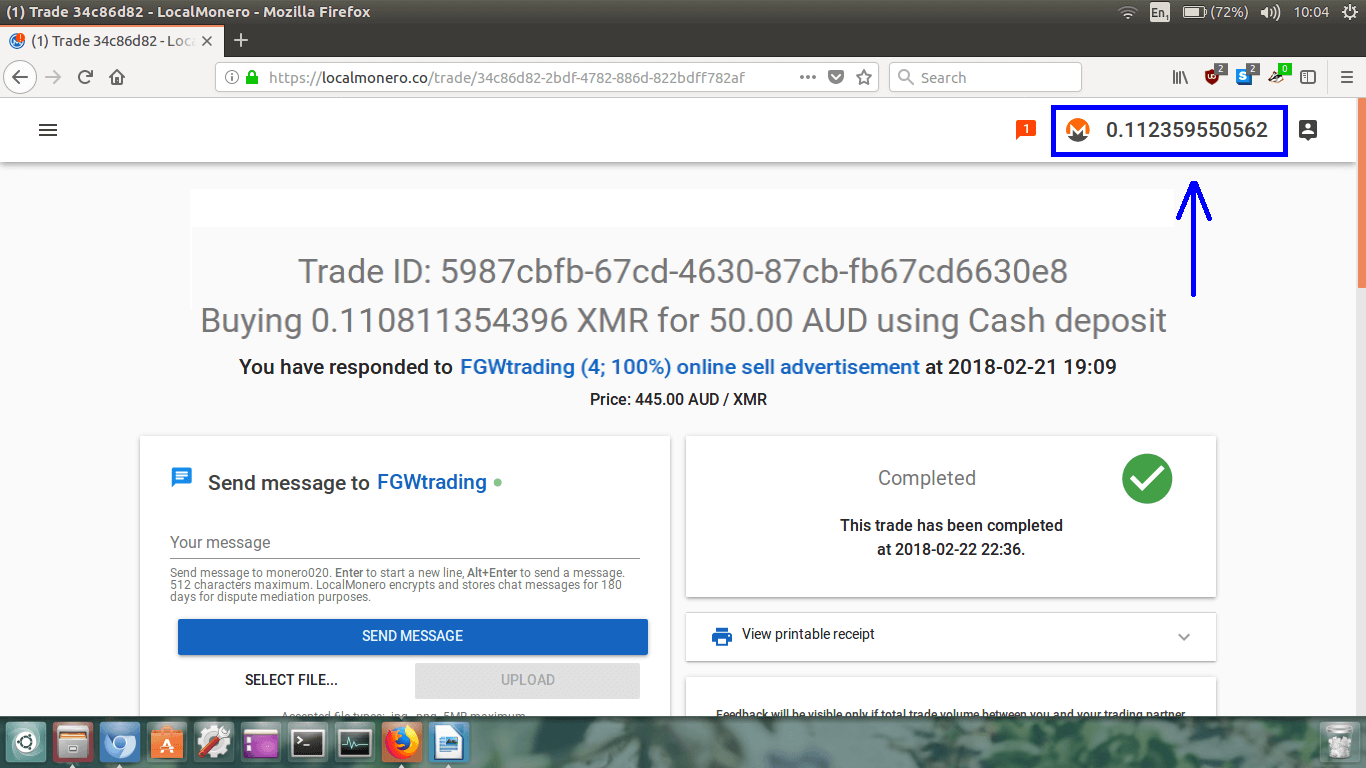
Your LocalMonero wallet will now load up in a new page.
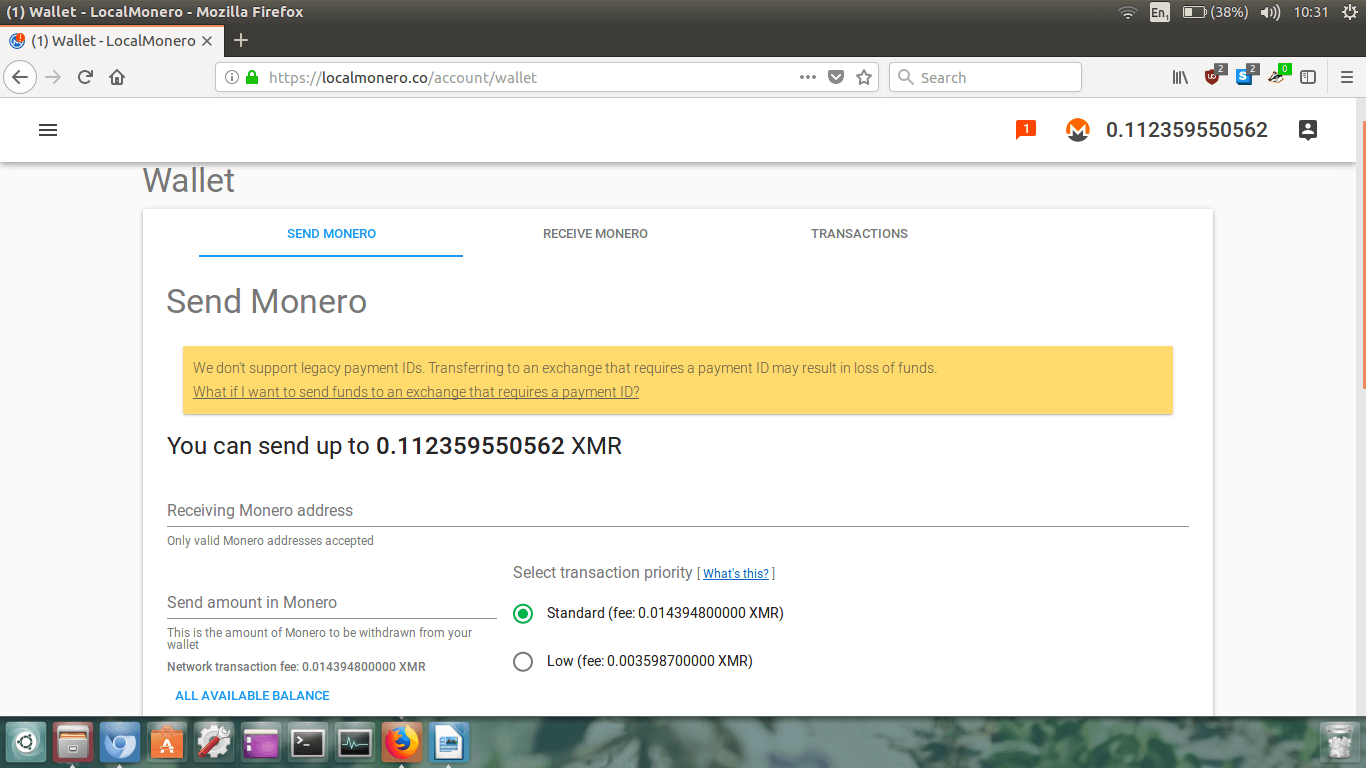
My Monero is there! Hooray :-)
It says I can send my entire balance of 0.112359550562 XMR.
We do not ever want to leave our Monero in a wallet controlled by a third party such as an exchange.
If the exchange is hacked or decide to shut up shop and run off with our Monero then we would lose all
our XMR.
So, because I don’t want anyone else holding onto my Monero for me, I want to withdraw all my XMR into my
personal Monero wallet. Wallets I recommend to use are the
Monero GUI wallet
with a remote node, a
paper wallet, the Monerujo wallet from the Google Play Store, or the Cake wallet from the Apple App
Store. The MyMonero webwallet is really easy to use, but is more susceptible to phishing attacks so I
wouldn’t recommend using it.
Side note: You can also send your XMR directly to someone else if
you want to, just type in their receiving address instead. DO NOT SEND YOUR MONERO TO A WALLET REQUIRING
A PAYMENT ID! If you need to, send it to your own wallet first, and then send it out from your own
wallet that supports payment IDs. Payment IDs is an older feature replaced by Integrated Addresses,
but not everyone has adopted integrated addresses yet.
What we are going to do is copy and paste our personal Monero wallet address (or whichever address we want
our Monero to go) into where is says
Receiving Monero address.
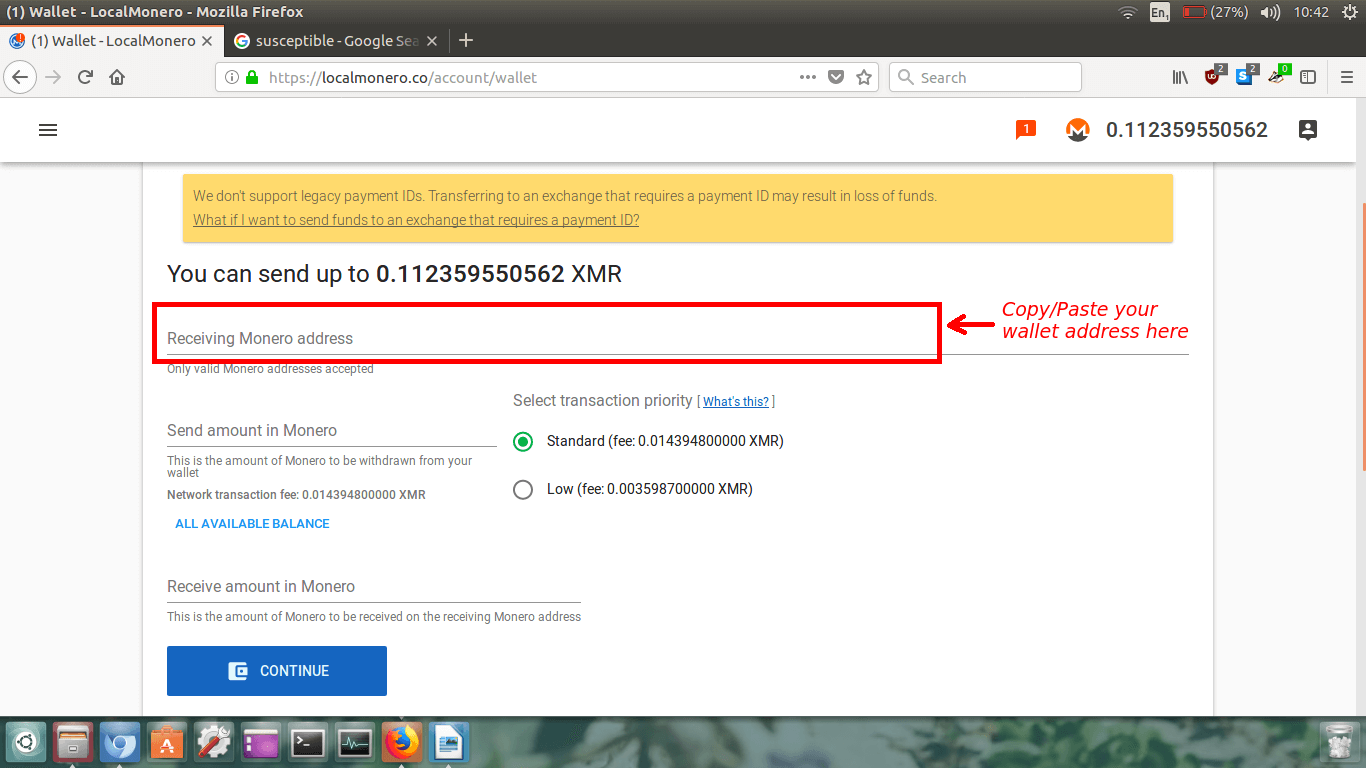
Triple check that you got the address correct. An easy way to do this is ensure the first few characters
are correct, and the last few characters are correct, and then just cross check the middle ones the best
you can.
Now we have to decide how much to send, and choose the transaction fee we want to pay.
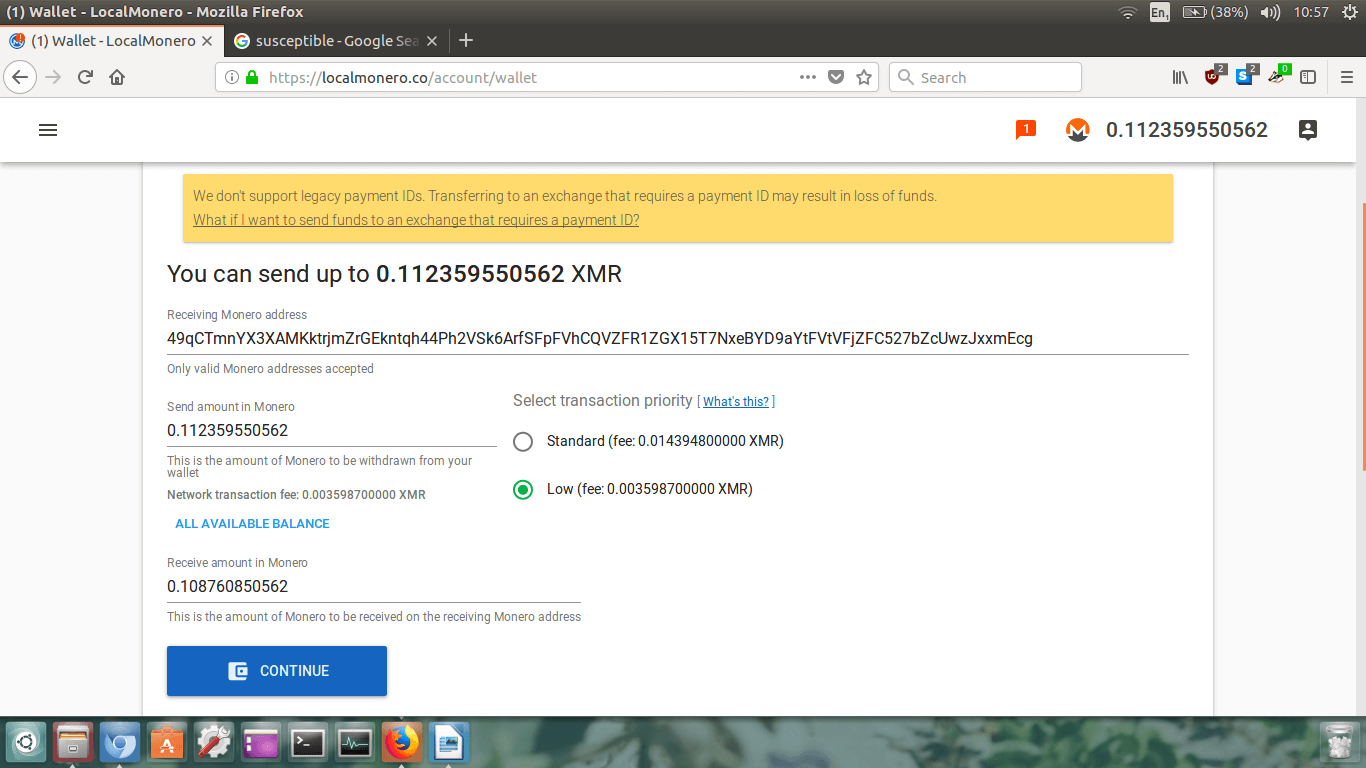
If you want to send all your Monero, instead of typing the amount in the
Send amount in Monero section, just click the blue text below that
says
ALL AVAILABLE BALANCE to save yourself some time.
After that we need to
Select transaction priority. I highly
recommend you choose the
Low fee. This will save you money,
and typically your transaction will still make it into the next block without paying the standard fee.
In my opinion only choose
Standard if you require urgency,
however at the time of writing, paying the standard fee will not be any quicker than paying the low fee.
Standard will only be quicker if there are a lot of transactions awaiting confirmation in the blockchain.
Expect your transaction to take roughly 20mins.
At the bottom you will see
Receive amount in Monero. This is the
amount you will receive in the wallet you are sending the XMR to. It is the send amount minus the
transaction fee.
Check your receiving address is correct one last time and if you are happy with everything, then click
the big blue
CONTINUE button.
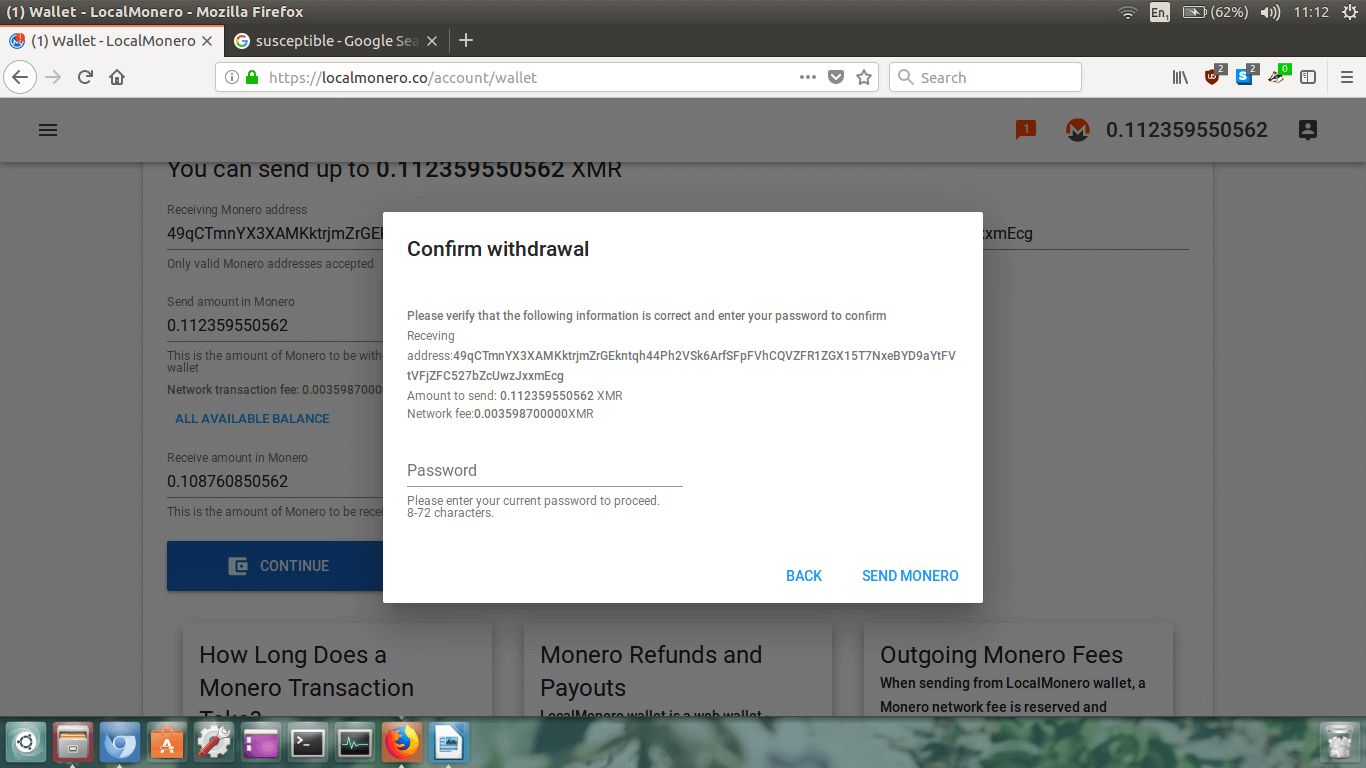
The
Confirm withdrawal box will appear. Check the address is
correct, and the send amount and fee are right.
Once you’re happy, type in your password and click
SEND MONERO.
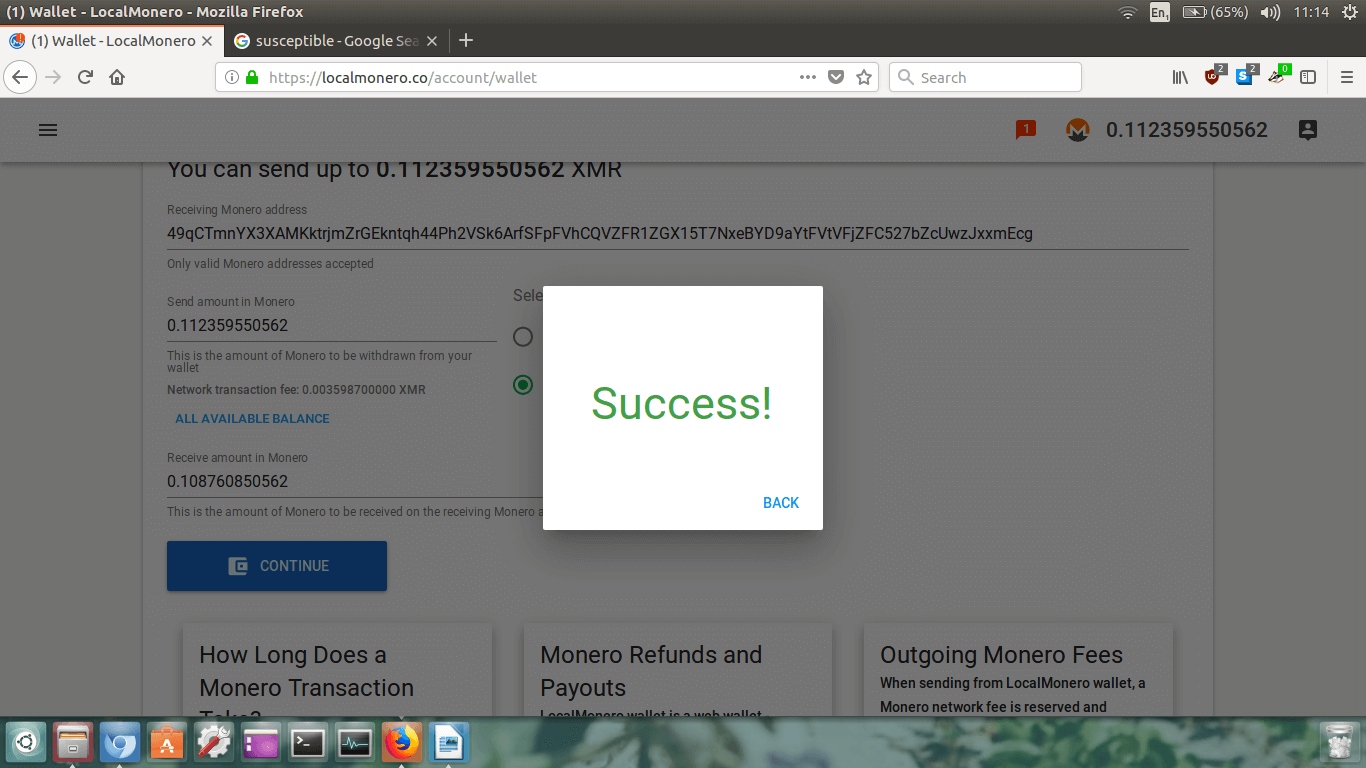
You will now see the success box appear!
Woohoo!!!!
SUCCESS!!!
Click
BACK.
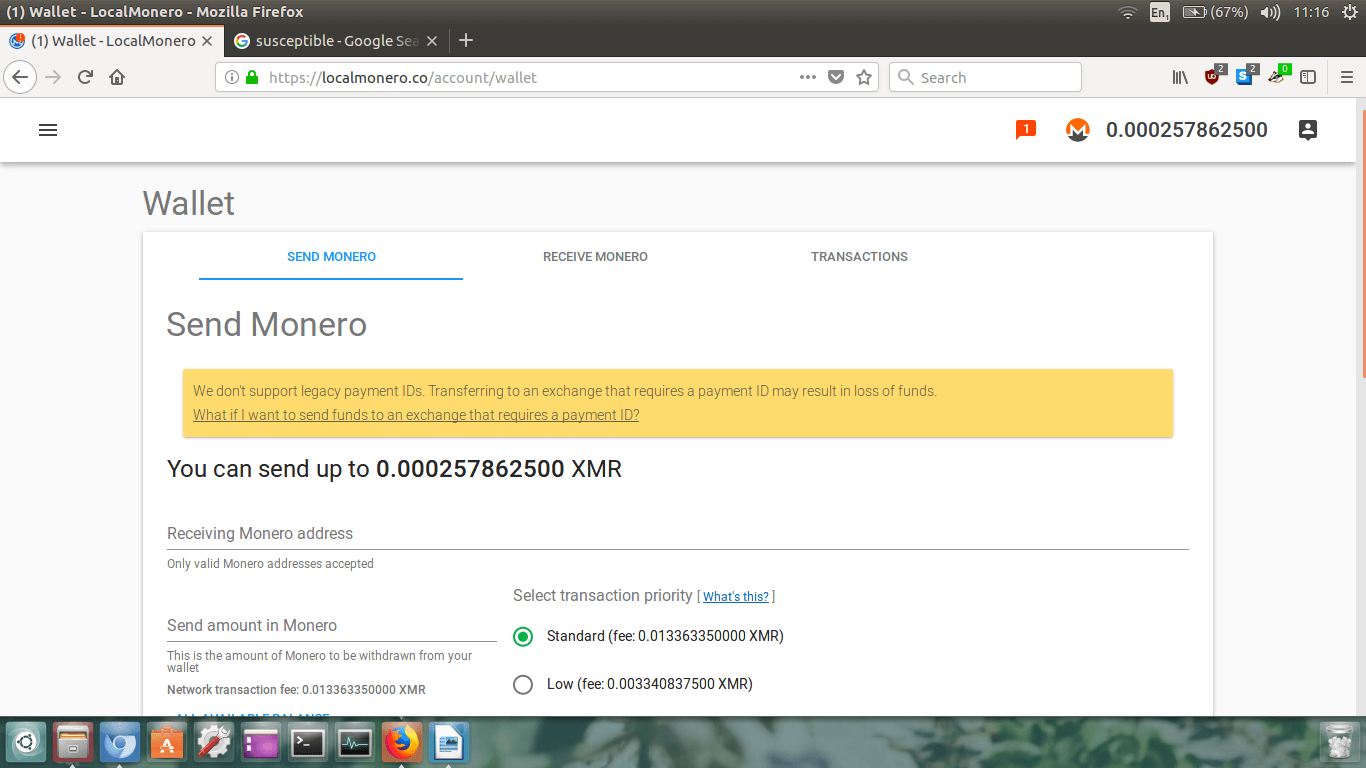
You will now see your wallet page reloaded.
Your balance will change. You can see above my balance is now 0.000257862500 XMR.
Don’t worry about any residual left over Monero. For me, it’s only about 5 cents worth and not even
enough to cover a transaction fee.
Step 11.
Go to whichever personal Monero wallet you are using and check your balance. Remember give it about
20mins and it should be in there.
That’s it!
Conclusion
You have now successfully purchased XMR using
LocalMonero. How easy was that!
To recap everything you did - you signed up, chose a seller, communicated with them, made payment,
received your XMR in your LocalMonero wallet, left the seller feedback, and then withdrew your XMR to
your personal Monero wallet.
John's beer money:
49qCTmnYX3XAMKktrjmZrGEkntqh44Ph2VSk6ArfSFpFVhCQVZFR1ZGX15T7NxeBYD9aYtFVtVFjZFC527bZcUwzJxxmEcg


 Avoid any potential phishing attacks in which you end up on a fake website by making sure the website address
is correct (https://localmonero.co).
 First enter in your username.
 If everything was successful you will see the Registration success! page.
 Type in your username and password. Ignore the one-time password as we haven’t enabled it.
 Now, we’re ready to buy some Monero. In my opinion, the two best ways to go about is to either buy your
Monero with your local fiat currency (e.g. USD, EUR, GBP, AUD, etc.) or Bitcoin.
 At the moment we need to scroll down to view the Monero for sale listings.
 Now I’ve scrolled down I can see all the listings available. There don’t appear to be a whole lot of
users selling Monero in Australia at the moment.
 On the left, we can see the seller’s name along with an eBay style seller rating. This is important
to check as we want to buy off someone who is reputable, and is going to conduct business quickly.
In the above image we can see that seller FGWtrading has made 4 transactions and has a 100% rating.
I’d suggest only dealing with sellers who have 100% ratings.
 After that we can see the payment methods the seller accepts. FGWtrading accepts cash deposit at a
variety of different Bank’s ATMs and branches.
 The third thing we need to look at is the price per XMR. The cheapest is listed first. FGWtrading is
selling Monero for $439.13AUD per XMR. This is cheaper than all the other sellers listed.
 Finally, we need to look at the Limits. This is the amount of
dollars per transaction we can make with the seller. In my case here, FGWtrading will sell anywhere
from $0 to $753.93AUD worth of Monero per transaction. This is ok for me as I do not want to buy a large
amount, however if I wanted to buy over $1000AUD worth, then the only two sellers offering limits
over $1000 are Mrcoins and Blue, and it may be most convenient to buy from them.
 Out of those three, FGWtrading has a lower number of ratings compared to Mrcoins and moneroTraders,
however FGWtrading is considerably cheaper and still has a 100% rating so I will go with them.
 I will choose to buy from FGWtrading now and click the orange BUY
button next to their listing. Obviously, right now you will be buying your Monero from a different vendor,
so use my advice above to choose a good seller that suits your needs, and click their
BUY button.
 In the top left section, we can see the seller’s information like on the previous page. In my case,
you will see that the price has slightly increased to $444.82AUD. This is because like all
cryptocurrencies, Monero’s price is highly volatile and a 5% swing in price within 15mins is not unusual.
 Now you need to double check the seller’s Terms of trade on the
right hand side of the screen. Check that you are happy to pay using their method.
 I want to buy $50AUD worth of Monero so I just typed in 50. It automatically loads up how much Monero
you will receive from that seller.
 Again, I can see that the amounts have changed due to the volatility in price. I should have been quicker
and I would have gotten a little more XMR! Anyway, it doesn’t really matter, I just need my Monero ASAP!
 Type your message in the box if you need to contact the seller and click the big blue
SEND MESSAGE button.
 Once it has sent you will see a record of your sent message in a chat box just below where you typed
it in.
 Log back in, and click the three lines in the top left corner to open the left sidebar menu.
 Easy! Now you will see your Dashboard.
 To return to the open trade, just click on the orange VIEW button.
 Scroll down to where it says Step two: confirm the payment.
 Now that we’ve paid, click the big blue I HAVE PAID button.
 Now we have to confirm the payment. Click CONFIRM PAYMENT COMPLETE.
 Easy! Now we just wait for confirmation from the seller! Time to grab another beer and relax until it is
cleared.
 Once you’re logged back in, check up in the upper right hand corner to see if you have any new
notifcations (the notification icon is the little orange speech bubble with the number inside it)
or your XMR balance has changed.
 Well fancy that! I’ve got a new notification, and it appears that I have received my Monero!
 Let it load up.
 You will now see all your notifications. You can see that I’ve highlighted my completed trade in the
blue box. It should have a tick and say completed. Great!
 Let’s now click on the completed notification. Put your mouse over the completed notificaiton, wait for
it to highlight itself, and click on it.
 You will see on the right side of the page it will say Completed
and have a big green circle with a tick in it.
 If you want to, you can view and print a receipt of this transaction. This may be handy for future tax
purposes.
 We now also have to leave feedback for the seller. Choose the feedback you wish to give (positive,
neutral or negative), and just like on eBay or Amazon type them a feedback message so that potential
future buyers can refer to it, then click the big blue box LEAVE FEEDBACK.
 Your LocalMonero wallet will now load up in a new page.
 My Monero is there! Hooray :-)
 Triple check that you got the address correct. An easy way to do this is ensure the first few characters
are correct, and the last few characters are correct, and then just cross check the middle ones the best
you can.
 If you want to send all your Monero, instead of typing the amount in the
Send amount in Monero section, just click the blue text below that
says ALL AVAILABLE BALANCE to save yourself some time.
 The Confirm withdrawal box will appear. Check the address is
correct, and the send amount and fee are right.
 You will now see the success box appear!
 You will now see your wallet page reloaded.
 monero.how